Summer SOS: How to Spot & Stop Common Pests on Heat-Stressed Plants
Quick answer: Summer pest control works best when you identify the pest early, isolate affected plants, inspect leaf undersides and new growth, and use the treatment that matches the pest rather than spraying everything the same way.
To begin with, one late-summer morning, I walked onto my balcony and found a tomato plant covered in fine webbing. More specifically, tiny moving dots were scattered across the undersides of the leaves: spider mites. As a result, I had noticed the damage too late, and the infestation was already severe enough that I removed the plant to protect nearby basil and rosemary.
However, the mistake wasn't that I lacked a treatment — it was that I hadn't inspected the plant closely enough. For example, spider mites can build quickly in hot, dry conditions, and early stippling is easy to miss. Therefore, a brief check of leaf undersides a few days earlier would have made the problem much easier to manage.
In this guide, you'll learn what to check when a plant is suddenly under attack during hot weather. It covers five common summer pests, the signs that separate them, practical first steps, treatment choices, prevention, and recovery — with an emphasis on early identification rather than routine spraying.
What's on Your Plant? The 60-Second Diagnosis
First, use the symptoms below to narrow down the pest:
| What You See | Where You See It | Most Likely | Go To |
|---|---|---|---|
| Fine webbing between leaves/stems | Underside of leaves | Spider Mites | Section 1 |
| Stippled, speckled yellow leaves (no webbing yet) | Scattered across the plant | Spider Mites (early) | Section 1 |
| Clusters of tiny green/black bugs on stems | New growth, flower buds | Aphids | Section 2 |
| Sticky residue on leaves below | Under an aphid colony | Aphids (honeydew) | Section 2 |
| White cottony fluff in crevices | Leaf joints, stem crotches | Mealybugs | Section 3 |
| Cloud of tiny white insects when you brush the plant | Leaf undersides, fly up when disturbed | Whiteflies | Section 4 |
| Silvery streaks or scars on leaves | Leaves and petals | Thrips | Section 5 |
| Black specks (like pepper) on leaf surface | On top of leaves | Thrips (frass) | Section 5 |
| White powdery coating on leaf surface | Top of leaves | Powdery Mildew | Fungal section |
Why Heat-Stressed Plants Are Pest Magnets (The Science)
Next, it helps to understand why pest pressure can become more obvious during hot weather. In general, three mechanisms are especially useful to understand:
1. Heat stress changes plant chemistry and resilience. For example, heat and drought can alter the volatile compounds plants release and change how well leaves maintain normal defenses. However, pest responses differ by species, so there is no single “distress signal” that guarantees an attack. As a result, a heat-stressed plant may have less margin for additional feeding damage. often has less margin for additional feeding damage.
2. Many pests develop faster in warm conditions. In addition, spider mites, aphids, whiteflies, and thrips are strongly influenced by temperature. Therefore, within a suitable range, warmer weather can shorten development time and allow populations to build faster, which is why a small problem can become much more obvious during a heatwave.
3. Severe heat can reduce a plant's ability to recover. Meanwhile, plants use chemical and physical defenses against feeding insects, but prolonged heat and water stress can disrupt normal growth and recovery. However, that does not mean every hot plant will attract pests — it means existing pest pressure can become harder for the plant to tolerate.
The 5 Most Common Summer Pests (And Exactly How to Beat Each One)
For identification, each pest has a different appearance, a preferred host plant, and a treatment window. Therefore, learning to identify them quickly — and knowing which treatment actually works for which pest — is the difference between saving a plant and losing it.
1. Spider Mites — The Heatwave Specialist
What they look like: Tiny red, brown, or pale dots smaller than a pinhead. At first, you may notice stippled or speckled yellow leaves before you see the mites themselves. Advanced infestations can produce fine webbing between leaves and stems.
To confirm the pest, hold a white piece of paper under a leaf and tap gently. Moving dots on the paper are a useful clue, especially when the leaf also shows stippling or webbing.
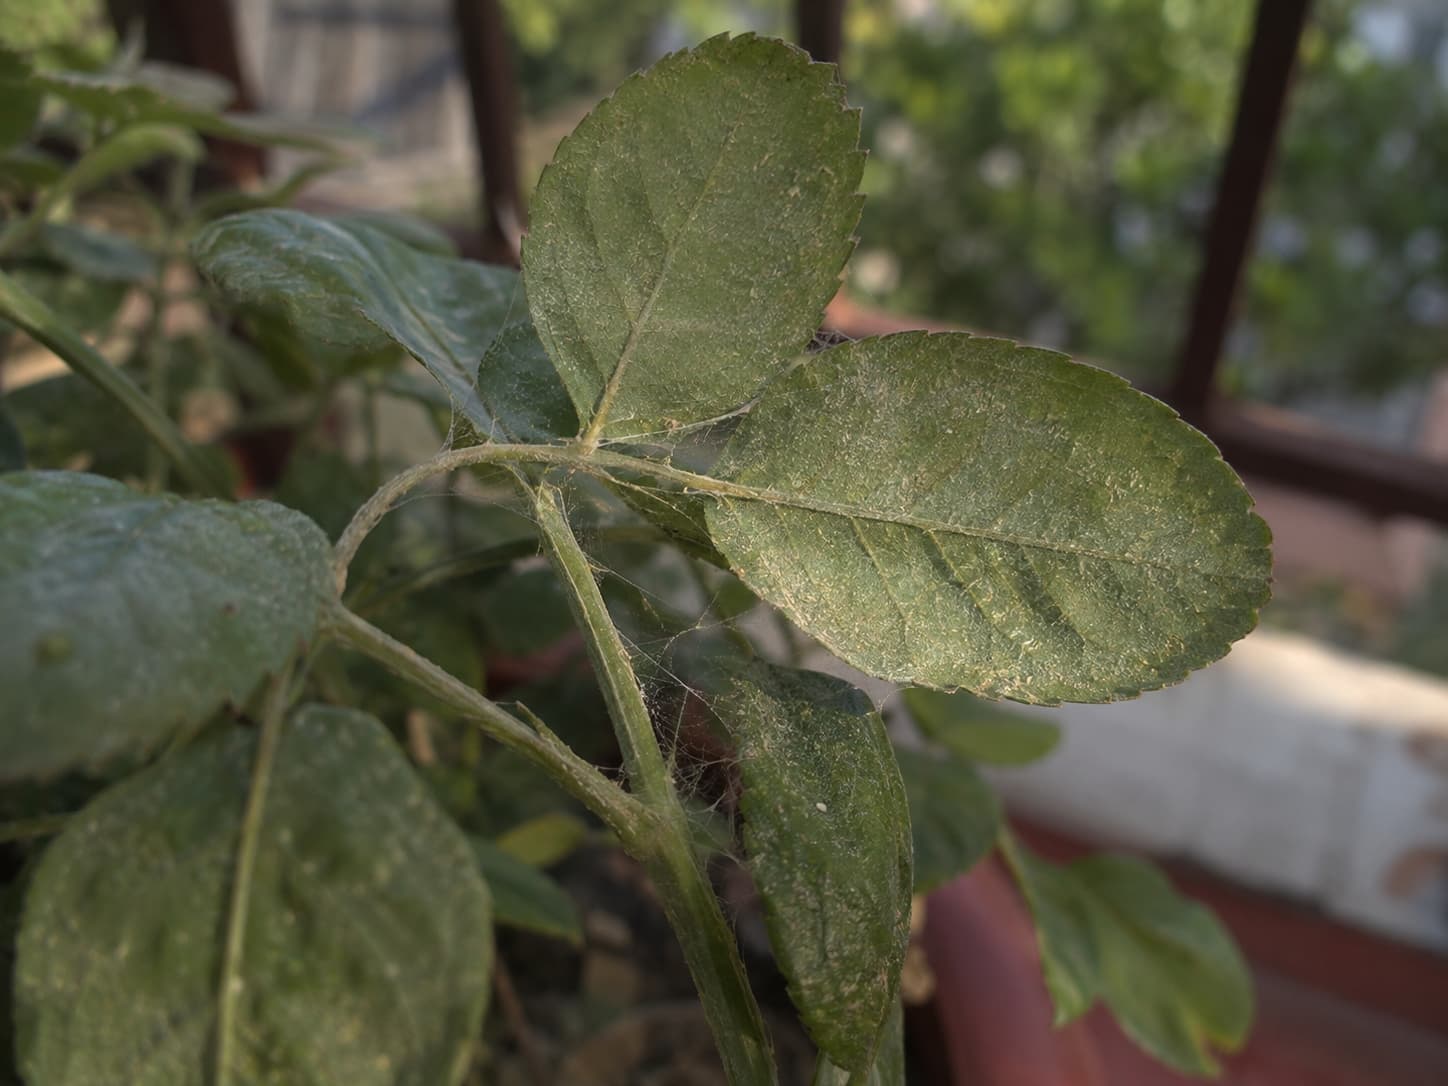
Plants they target: Tomatoes, cucumbers, beans, ferns, pothos, ivy, rosemary, marigolds. In addition, spider mites can feed on many different host plants — they'll attack almost anything in hot, dry conditions.
Why summer favors them: For example, spider mites often become more troublesome in hot, dry, dusty conditions. In addition, warm weather can speed their development, while drought-stressed foliage is less able to tolerate feeding damage.
Spider Mite Treatment Steps
- Isolate or separate the plant when practical. Create enough distance to reduce contact with nearby plants, and avoid moving from an infested plant directly to a clean one without washing your hands and tools.
- Rinse leaf undersides. For example, a firm but plant-safe stream of water can remove many mobile mites and some eggs. Then, repeat only as needed while monitoring the plant, and avoid damaging tender foliage.
- Use a labeled miticide, insecticidal soap, horticultural oil, or neem-based product when appropriate. Follow the product label for concentration, temperature limits, repeat interval, edible-crop restrictions, and the number of applications. Recheck the plant for newly emerged mites rather than relying on one spray.
- Reduce excessively hot, dry conditions where you can. Meanwhile, better hydration, cleaner foliage, and relief from extreme heat can reduce plant stress. Humidity alone is not a reliable spider-mite treatment and should not come at the expense of airflow.
2. Aphids — The Sap-Sucking Swarm
What they look like: Tiny pear-shaped insects, 1–3mm long, usually clustered on new growth and flower buds. Colors vary by species: green (most common), black, yellow, pink, or white. In general, they move slowly and do not scatter quickly when disturbed. In addition, look for sticky "honeydew" residue on leaves below the colony — this is aphid waste, and it often grows black sooty mold.
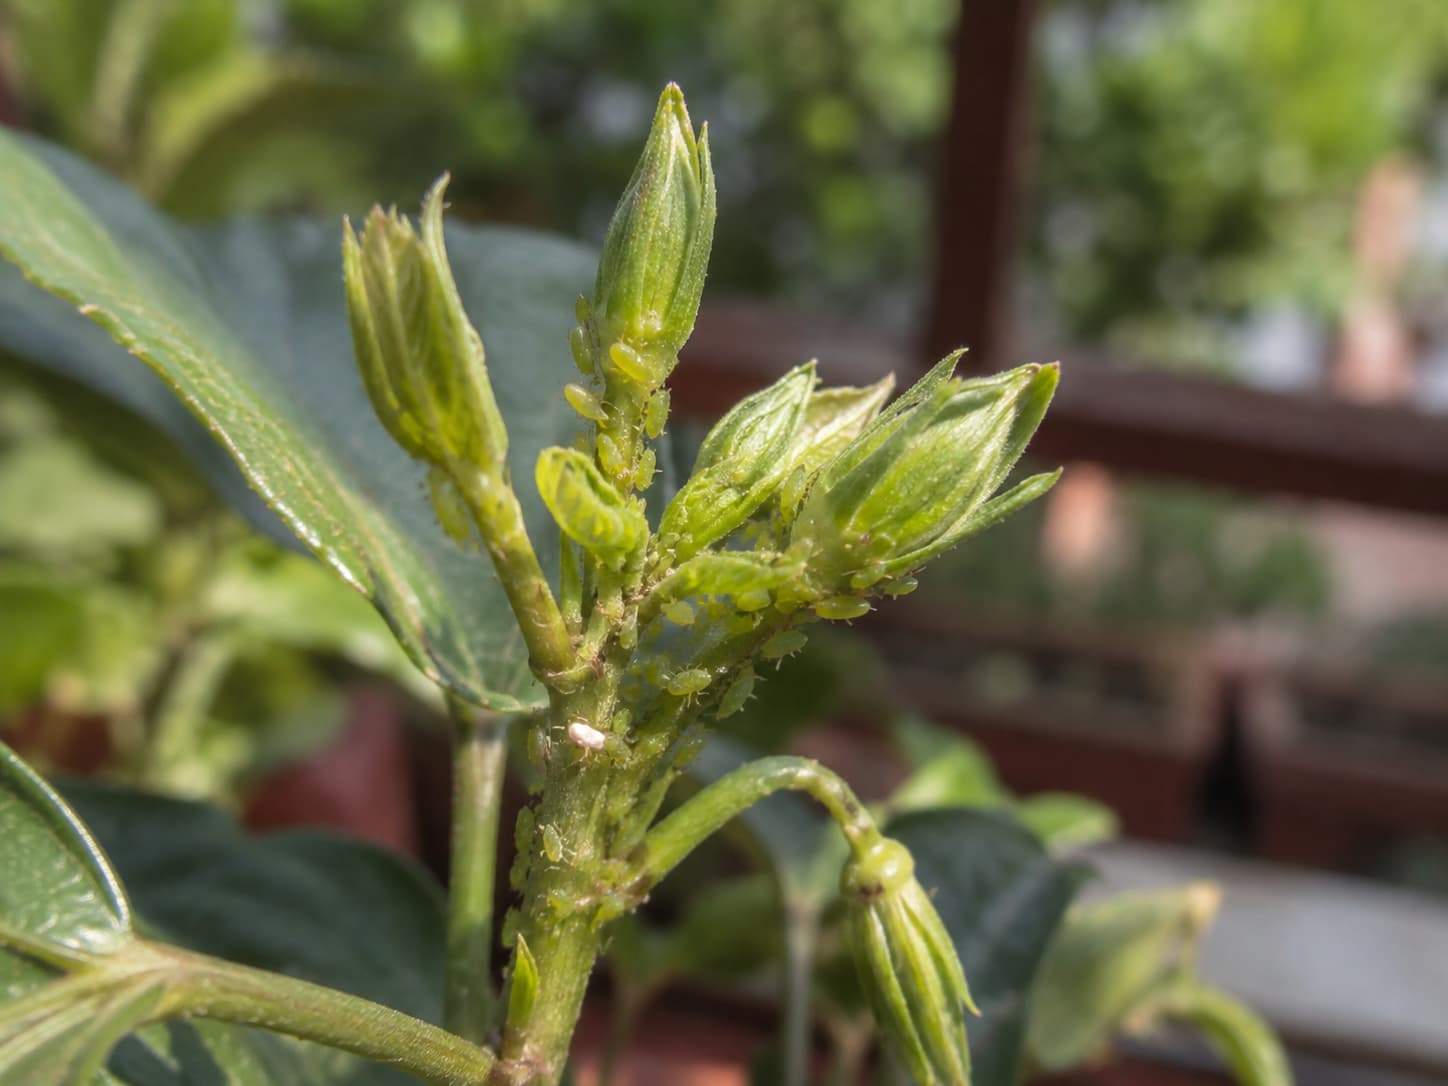
Plants they target: Roses, tomatoes, peppers, basil, lettuce, nasturtiums, hibiscus, milkweed. They prefer tender new growth and flower buds.
Why summer favors them: By comparison, aphids can reproduce rapidly when tender new growth is available. However, outbreaks also depend on the host plant, predators, rainfall, and local climate., but outbreaks also depend on host plant, predators, rainfall, and local climate.
Aphid Treatment Steps
- Rinse aphids from new growth. For example, a firm stream of water can dislodge many aphids from sturdy plants. Then, reinspect the same shoots over the next several days and repeat only as needed.
- Use insecticidal soap, horticultural oil, or another product labeled for aphids when needed. Cover the colony carefully and repeat only according to the label.
- Remove heavily infested stems. If a stem tip is completely covered in aphids, cut it off and dispose of it in a sealed bag. The plant will push new growth.
- Protect natural predators. In addition, lady beetles, lacewings, hoverfly larvae, and parasitoid wasps can suppress aphids outdoors. Therefore, avoid broad-spectrum treatments when a more targeted control will do the job.
3. Mealybugs — The Hidden Sap-Suckers
What they look like: Small, oval, white, cottony insects about 3–5mm long. For example, they cluster in leaf joints, stem crevices, and where leaves meet stems. They look like tiny bits of cotton or mold. In addition, the white coating is a waxy secretion that repels water and many contact insecticides.
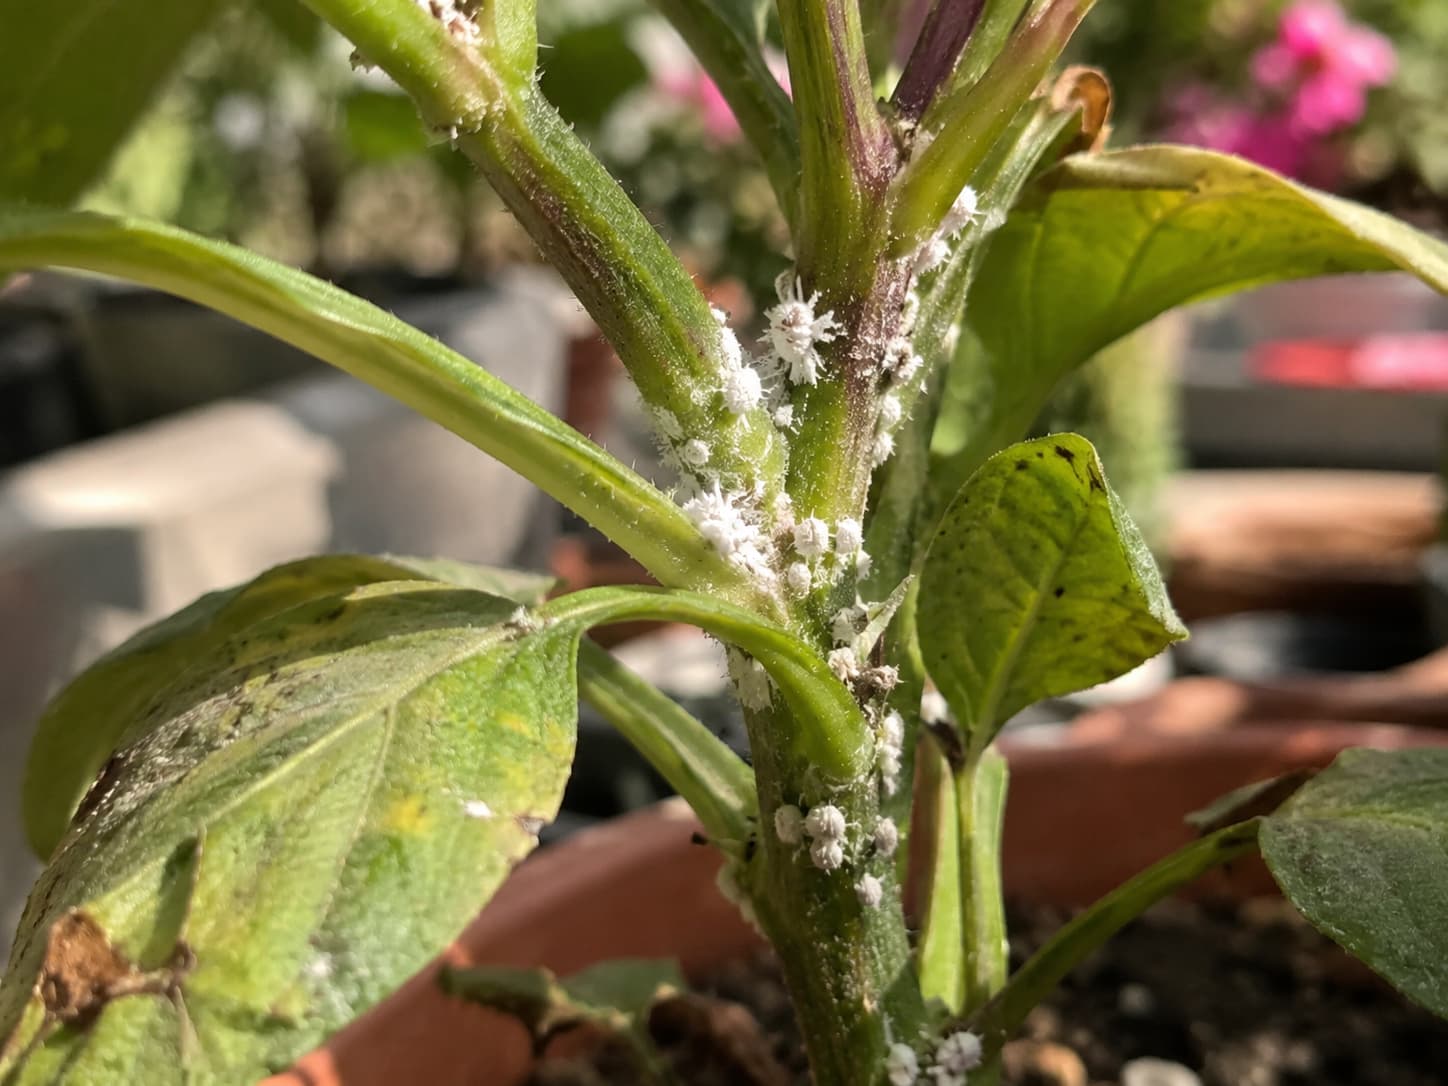
Plants they target: Succulents (jade, echeveria), herbs (rosemary, basil), coleus, ficus, orchids, hibiscus. They strongly prefer plants with tight leaf joints where they can hide.
Why summer favors them: Meanwhile, mealybugs may reproduce faster in warm conditions and can remain hidden in protected leaf joints, stem crevices, and root zones. As a result, stressed plants may show damage more quickly, especially in crowded containers.
Mealybug Treatment Steps
- Spot-treat with rubbing alcohol. Dip a cotton swab in 70% isopropyl alcohol and dab each mealybug directly. The alcohol dissolves their waxy coating and kills them on contact. This is the most effective treatment for small infestations.
- Rinse the plant. Next, after spot-treating, rinse the entire plant with lukewarm water to remove dead mealybugs and any residue.
- Use a labeled contact treatment if spot removal is not enough. Mealybugs' waxy coating can make coverage difficult, so inspect crevices carefully and follow the product label.
- Check the root zone if the plant keeps declining. Meanwhile, root mealybugs can appear as white, waxy material around roots and potting mix. Isolate the plant, discard heavily infested mix, clean the container, and use a treatment labeled for the plant and pest before repotting.
4. Whiteflies — The Flying Swarm
What they look like: Tiny white insects, about 1–2mm long, that look like miniature moths. Typically, they rest on leaf undersides and fly up in a cloud when the plant is disturbed. In addition, eggs may be found on leaf undersides. Meanwhile, nymphs are flat, translucent ovals that can resemble scales.
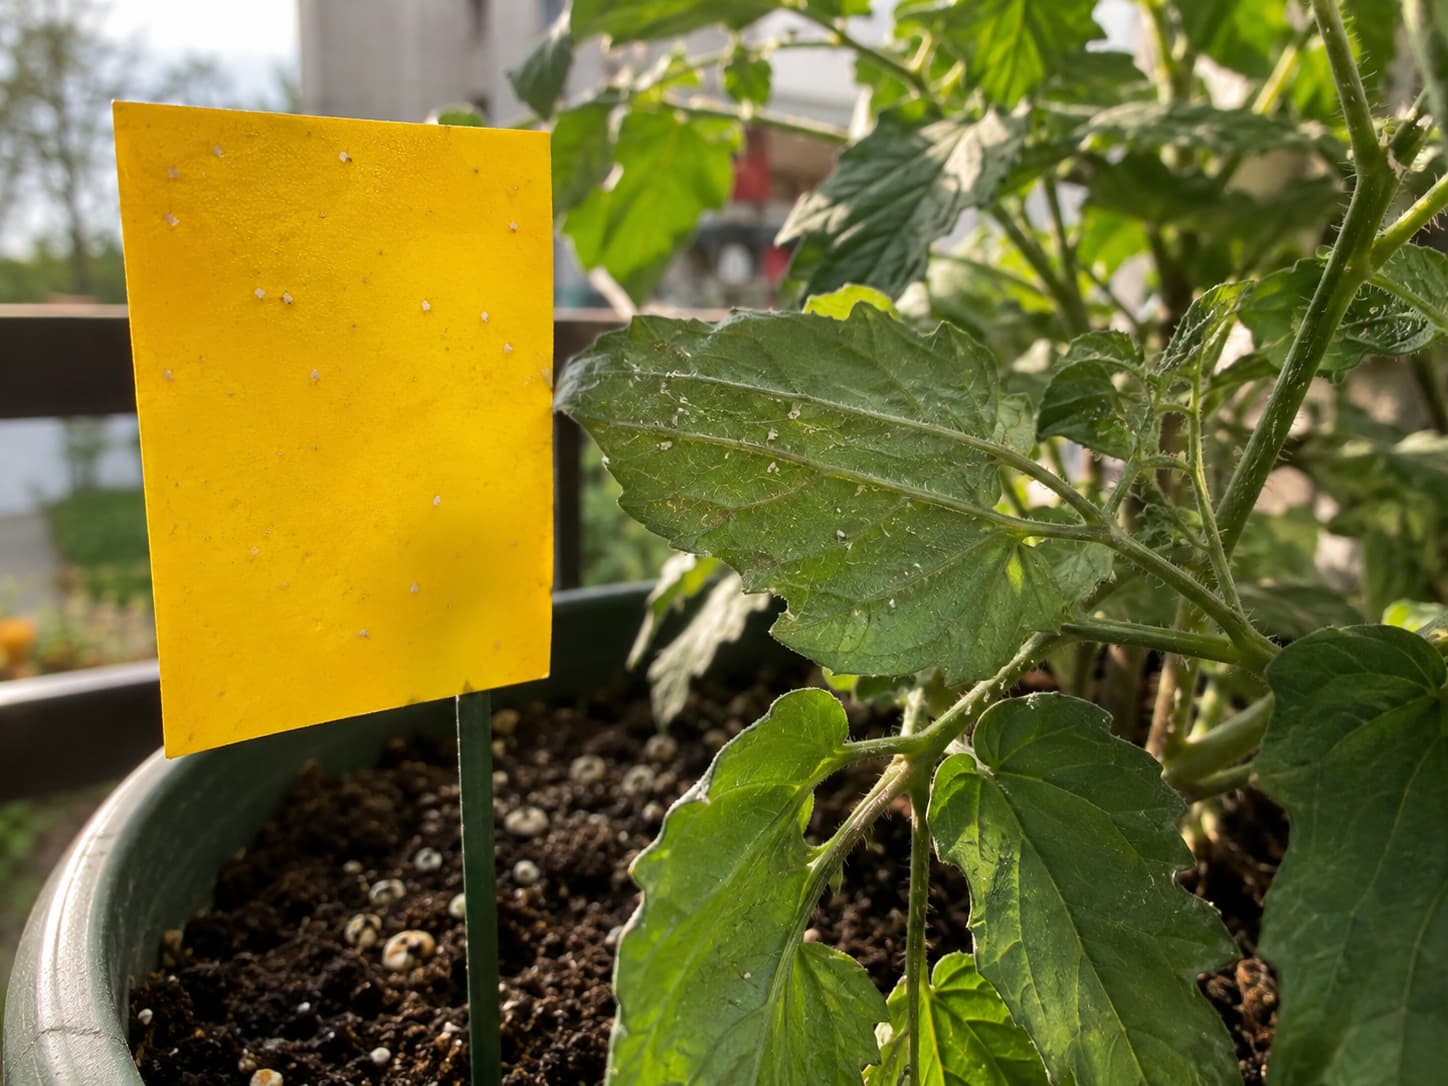
Plants they target: Tomatoes, peppers, cucumbers, hibiscus, poinsettia, fuchsia, lantana. They prefer plants with broad leaves.
Why summer favors them: In addition, whiteflies are warm-weather pests in many climates, and generations can overlap during sustained heat. Therefore, broad-leaved plants with plenty of tender growth are especially useful places to inspect.
Whitefly Treatment Steps
- Remove adults mechanically when practical. On sturdy plants, a small handheld vacuum used carefully in the cool part of the day can reduce adult whiteflies. Afterward, empty the collection chamber away from plants.
- Use yellow sticky cards for monitoring. For example, sticky cards can help reveal adult whitefly activity and reduce some adults, but they do not control eggs or nymphs on leaf undersides.
- Use a product labeled for whiteflies if numbers keep increasing. Insecticidal soap, horticultural oil, or some neem-based products may be appropriate. Therefore, coverage of leaf undersides matters, and repeat timing should follow the label.
- Consider reflective mulch in suitable outdoor setups. For example, reflective surfaces may make it harder for adult whiteflies to locate host plants in some settings. Keep drainage and root-zone temperature in mind, and do not cover the soil so tightly that watering becomes difficult.
5. Thrips — The Invisible Scar Makers
What they look like: Extremely tiny (1–2mm), slender insects, yellow to dark brown. As a result, they can be hard to see without a magnifying glass. Therefore, the damage is often more visible than the pest: silvery, streaked scars on leaves and petals, deformed new growth, and black specks of frass (insect waste) on leaf surfaces. In addition, flowers may have brown edges or fail to open properly.
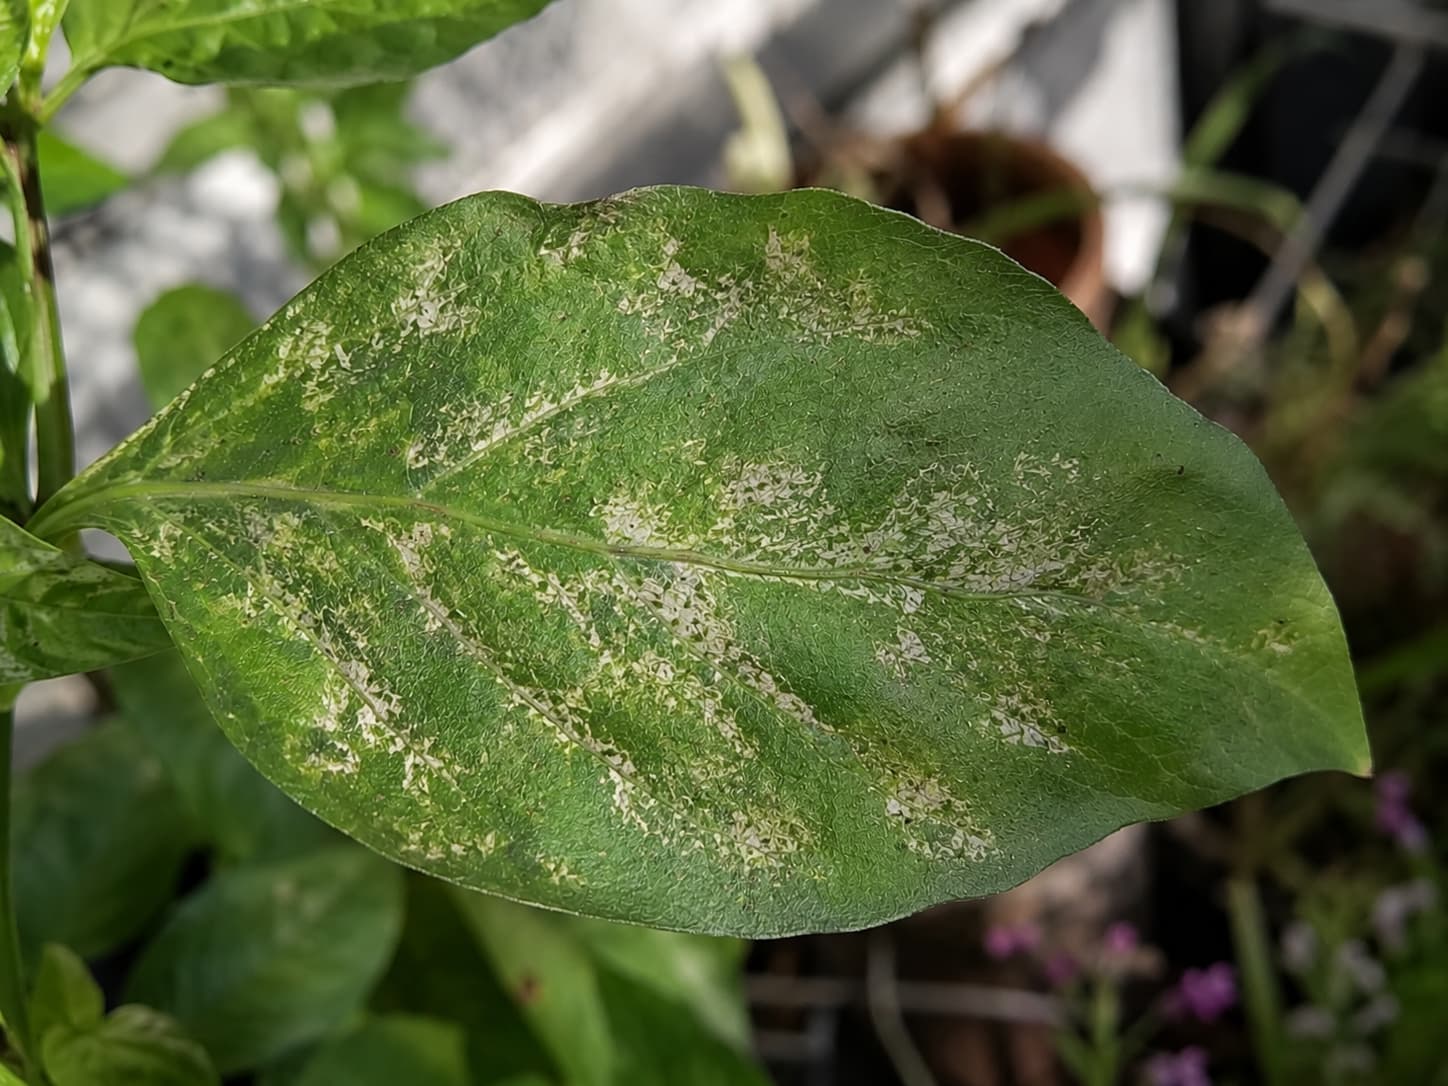
Plants they target: Roses, gladiolus, onions, garlic, peppers, tomatoes, monstera, philodendron, orchids. They're especially destructive to flowers and tender new leaves.
Why summer favors them: Finally, many thrips species develop quickly in warm weather and are difficult to spot because they are tiny and often feed in flowers, buds, or folded tissue. More importantly, some species also transmit plant viruses, so early identification matters.
Thrips Treatment Steps
- Blue sticky traps. For monitoring, blue sticky cards are often used for thrips (unlike most pests that prefer yellow). Place blue sticky cards near affected plants.
- Prune damaged tissue. Next, remove badly damaged leaves and flowers when appropriate. Thrips lay eggs inside plant tissue where sprays can't reach. In addition, removing badly damaged tissue can reduce protected pest stages.
- Use spinosad only when the label lists thrips and the plant. Spinosad can be effective against some thrips, but it can also affect beneficial insects. Most importantly, avoid spraying open flowers or active pollinators, and follow all label timing and repeat-application directions.
- Reduce plant stress and keep conditions balanced. Avoid relying on misting as a thrips control. Good watering, airflow, sanitation, and correct treatment are more dependable than trying to change humidity alone.
Pest ID at a Glance
| Pest | First Sign | Good First Step | When to Escalate |
|---|---|---|---|
| Spider Mites | Stippling, then fine webbing | Isolate if practical and rinse leaf undersides | Use a labeled mite treatment if numbers keep increasing |
| Aphids | Clusters on new growth and sticky honeydew | Rinse or prune heavily colonized tips | Use insecticidal soap, oil, or another labeled aphid treatment |
| Mealybugs | White cottony material in joints | Physical removal and close inspection | Use a labeled contact or systemic option where permitted and appropriate |
| Whiteflies | Adults fly up; immatures stay under leaves | Monitor with yellow cards and inspect undersides | Use a labeled whitefly treatment if populations rise |
| Thrips | Silvery scarring and dark specks | Remove badly damaged tissue and monitor with traps | Use a labeled thrips treatment; protect pollinators |
Fungal Diseases: The Secondary Threat
However, pests aren't the only threat to heat-stressed plants. In addition, fungal diseases can appear on stressed or damaged plants — and they often appear alongside or after pest damage, because pest feeding creates entry wounds for fungal spores.
Powdery Mildew
For example, powdery mildew appears as white or gray growth on leaf surfaces. It often develops when days are warm and foliage experiences favorable humidity patterns, even without prolonged leaf wetness. Therefore, improve airflow, remove badly affected tissue, and use a fungicide such as potassium bicarbonate or another product only when the label lists the plant and disease.
Botrytis (Gray Mold)
By contrast, Botrytis can appear as fuzzy gray-brown growth on flowers, stems, or leaves, often favored by humid, crowded conditions. As a result, remove affected tissue, improve airflow, avoid unnecessary overhead watering, and clear spent flowers and dead leaves promptly.
Anthracnose
Meanwhile, anthracnose can produce dark or sunken lesions that vary by host and pathogen. Therefore, reduce splash, water at soil level where practical, remove infected debris, and use a labeled fungicide only when identification and disease severity justify it.
What Doesn't Work (Stop Doing These)
Prevention: Stop Pests Before They Start
For prevention, regular inspection is more useful than routine preventive spraying. For example, a short weekly check can reveal stippling, honeydew, cottony residue, sticky-trap activity, or deformed new growth while the problem is still small.
Weekly Summer Pest-Check Routine
- Inspect several representative leaves and shoots. Check undersides, new growth, leaf joints, and flowers. Use phone-camera zoom if it helps you see tiny moving pests.
- Confirm the pest before treating. Stippling, honeydew, cottony residue, silvery scarring, and flying adults point to different problems.
- Remove obvious dead or heavily infested material. Dispose of it away from healthy plants and clean pruners afterward.
- Look for ants, sticky residue, webbing, and trap catches. In addition, these indirect clues can reveal a problem before the pest is easy to see.
- Use pesticides only when needed. Choose a product labeled for the pest and plant, protect pollinators, and follow all concentration, repeat-interval, temperature, harvest, and safety directions.
Post-Infestation: How to Help Plants Recover
After treatment, the plant needs time to recover. Therefore, avoid pushing a stressed plant to grow or bloom immediately. — don't ask it to grow, bloom, or produce fruit right away.
First, stabilize the plant. First, put it in conditions appropriate for the species, avoid abrupt light changes, and water according to actual soil moisture. Hold off on heavy fertilizing while the plant is still losing leaves or showing active stress.
Then clean up confirmed damage. Next, remove tissue that is clearly dead or badly infested, but avoid aggressive pruning until you can see which stems are recovering.
Resume normal care gradually. Then, return the plant to its usual light and feeding routine only after it is stable and producing healthy new growth. Finally, keep inspecting because recently stressed plants can be vulnerable to another outbreak.
Summer Pest FAQ
Treatments & Severe Infestations
1. Can I use the same neem oil spray on all my plants?
2. Should I throw away a plant that's heavily infested?
3. How do I prevent pests from coming back next year?
Prevention, Spread & Companion Plants
4. Can pests spread from my outdoor balcony plants to my indoor plants?
5. Are there plants that naturally repel pests?
Typical Summer Pest Timing
In practice, pest timing varies by climate, host plant, greenhouse or indoor conditions, and local weather. Therefore, use the table below as a rough planning guide for temperate Northern Hemisphere gardens — shift the timing earlier or later to match your local growing season.
| Season Stage | Common Pressure | What to Watch For |
|---|---|---|
| Late spring | Aphids; early mite activity in warm, dry sites | Tender shoots, curled leaves, honeydew, early stippling |
| Early summer | Aphids, mites, mealybugs | Leaf undersides, stem joints, protected crevices |
| Peak summer heat | Spider mites, whiteflies, thrips | Stippling, flying adults, sticky-trap catches, silvery scars |
| Late summer | Whiteflies, thrips, lingering mite pressure | New generations on stressed plants; inspect even after temperatures ease |
| Early fall | Variable insect pressure plus fungal disease in humid weather | Leaf spots, mold, remaining honeydew, declining foliage |
Useful Pest-Control Tools (Choose by Label, Not Brand)
Match the Tool to the Pest
In fact, you do not need a shelf full of pesticides. Instead, a few categories of tools cover many common problems, but the correct choice depends on the plant, pest, local regulations, and product label.
| Tool or Product Type | Useful For | How to Use It Well |
|---|---|---|
| Insecticidal soap | Aphids, some mites, whiteflies and other exposed soft-bodied pests | Use only a product labeled as insecticidal soap; coverage matters and household detergent is not a substitute |
| Horticultural oil or neem-based product | Some mites, aphids, whiteflies and scale-like pests | Follow temperature, crop, pest, concentration and repeat-application directions on the label |
| Spinosad product | Some thrips and caterpillars where the label permits | Avoid open flowers and active pollinators; follow the label exactly |
| Sticky monitoring cards | Adult whiteflies, fungus gnats, thrips and other flying pests | Use them mainly to detect and monitor activity; trap color depends on the pest |
| Hand lens or phone macro camera | Mites, thrips, eggs and tiny nymphs | Useful for confirming a pest before choosing a treatment |
A Simple Summer Pest-Control Sequence
Summer pests are common, but a serious outbreak is not inevitable. Most importantly, the biggest advantage is early detection: a small colony is usually easier to manage, requires less treatment, and is less likely to spread to neighboring plants.
For example, a practical sequence is: inspect regularly → identify the pest → isolate or remove heavily affected material when appropriate → start with physical or cultural control → use a labeled pesticide only if needed → keep monitoring for new activity → support the plant as it recovers.
Finally, keep inspecting for a while after the heatwave breaks. However, pest activity can continue after temperatures moderate, and plants weakened by summer stress may take time to regain normal growth.