Echeveria Care: Light, Watering, Soil & Common Problems
Echeverias are famous for neat, geometric rosettes, but indoor plants often lose that compact shape for one simple reason: home conditions are very different from a bright, fast-draining succulent habitat. The good news is that Echeveria care becomes much easier once you focus on light, drainage, and the condition of the potting mix instead of following a rigid schedule.
Give Echeveria the brightest suitable position you can provide, introduce stronger direct sun gradually, and use a pot with drainage holes plus a sharply free-draining cactus or succulent mix. Water thoroughly, then wait until the mix has dried substantially before watering again. Indoors, weak light and soil that stays damp too long are the two conditions to correct first when a rosette starts stretching, softening, or declining.
Echeveria Care at a Glance
Echeveria is a genus in the stonecrop family (Crassulaceae). Most commonly grown forms make fleshy rosettes and are kept as houseplants or warm-season container plants where winters are cold. Individual species and cultivars vary, so use the table below as a practical starting point rather than a rigid formula.
| Need | Practical starting point | What to watch |
|---|---|---|
| Light | Very bright indoor light; some direct sun can work after acclimation | Stretching, wider leaf spacing, loss of compact shape |
| Water | Water thoroughly, then let the mix dry substantially before the next watering | Soft, translucent tissue or mix that stays damp for long periods |
| Soil | Sharply draining cactus or succulent mix, amended if the base mix stays too wet | Dense, peat-heavy mix that remains wet after watering |
| Pot | Drainage holes; container only modestly larger than the root system | Standing water or a large volume of unused wet mix |
| Winter | Keep bright, cooler if possible, and water less often as drying slows | Weak growth from low light plus frequent watering |
1. Give Echeveria Strong, Appropriate Light
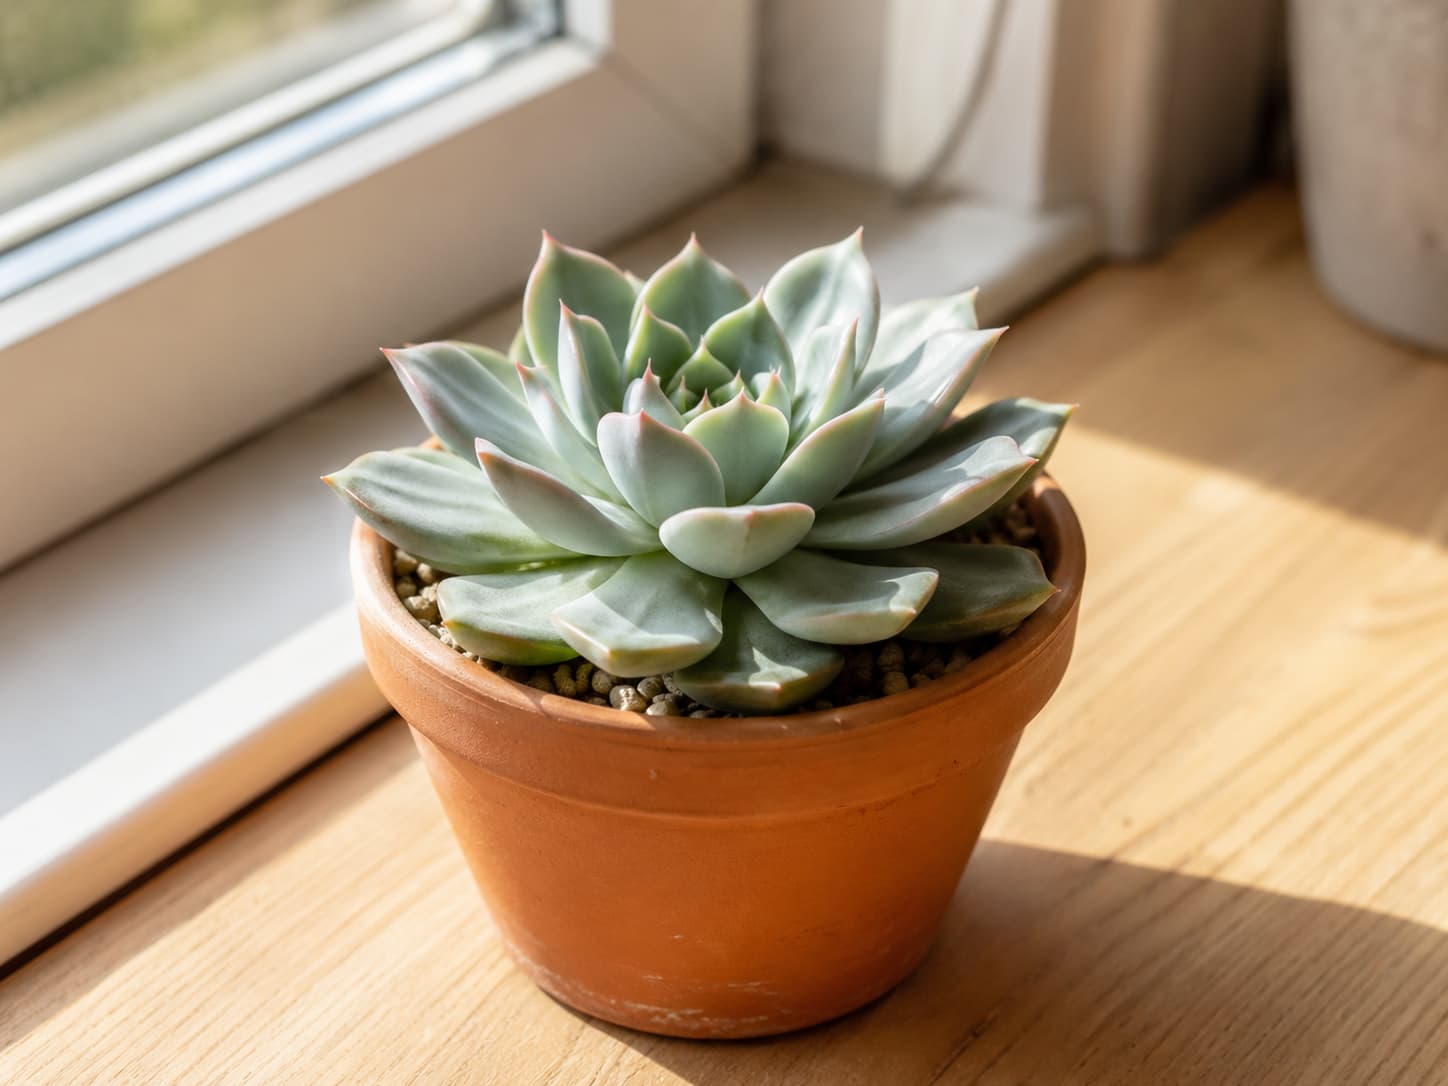
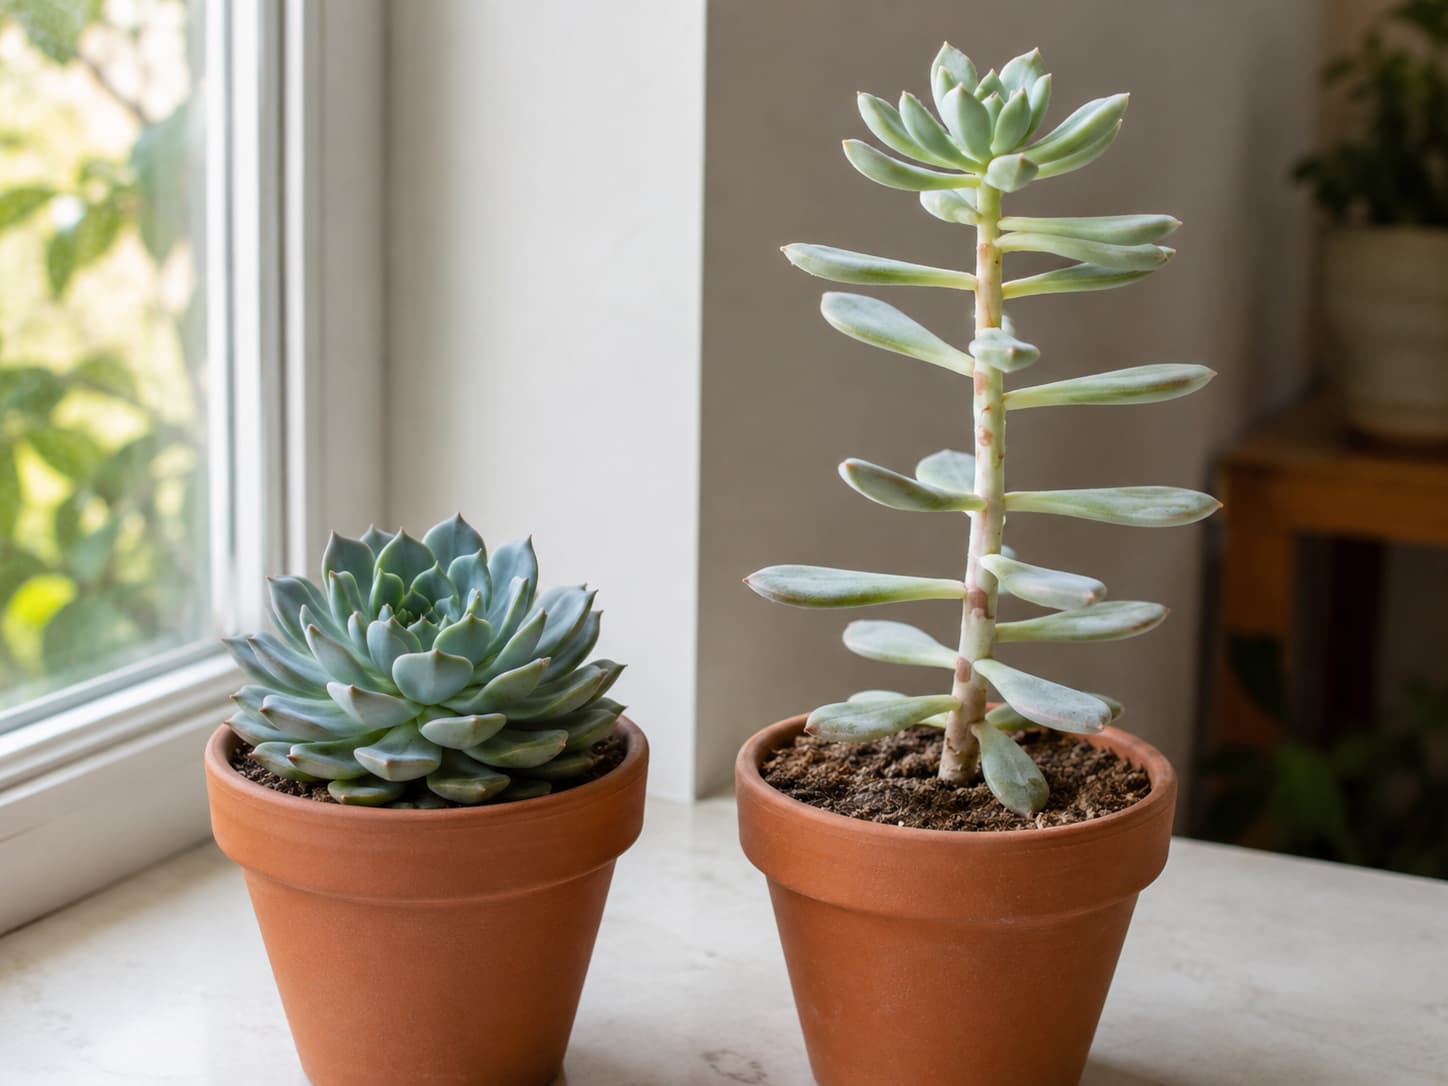
Light is the first thing to inspect when an indoor Echeveria loses its compact rosette shape. In weak light, new growth tends to stretch toward the light source, the stem lengthens, and the spaces between leaves become wider. This is called etiolation.
Outdoors, many Echeverias can handle substantial sun, while RHS guidance for the genus and several species also describes bright or filtered light. That is why a newly purchased indoor plant should not be moved straight from a shop shelf into intense midday sun. Increase direct-sun exposure gradually so the leaves have time to acclimate.
| Indoor position | What it often provides | What to check |
|---|---|---|
| South / southwest window | Often one of the strongest indoor options | Acclimate gradually if direct sun is intense |
| West window | Useful afternoon light in many homes | Watch for excess heat at the glass in summer |
| East window | Gentler morning light | Watch the newest leaves for stretching |
| North window | Usually the weakest exposure in the Northern Hemisphere | A grow light may be needed if the rosette elongates |
Window direction is only a starting point. Season, latitude, trees, nearby buildings, window coatings, and how far the plant sits from the glass can all change the amount of usable light. Let the plant’s new growth tell you whether the position is working.
Supplemental lighting can make indoor Echeveria care much easier when winter light is weak or the plant sits far from a bright window. Rather than relying on one universal number of hours, follow the light manufacturer’s distance and coverage guidance, use a consistent daily photoperiod, and adjust if the rosette continues to stretch or shows signs of light stress.
2. Water by the Potting Mix, Not the Calendar
Echeveria leaves store water, so the plant does not need frequent small drinks. The safer pattern is to water thoroughly and then give the root zone time to dry. How long that takes depends on light, temperature, pot size, pot material, airflow, season, and the composition of the mix. For reliable Echeveria care, drying speed matters more than the number of days since the last watering.
A Practical Watering Check
- Check below the surface. The top can look dry while the lower root zone is still damp.
- Learn the pot’s weight. A recently watered pot feels noticeably heavier than one that has dried down.
- Water the potting mix thoroughly. Apply enough water for the root ball to become evenly moistened.
- Let excess water drain. Empty any cachepot or saucer that holds standing water.
- Wait before watering again. Do not add more water while the root zone is still meaningfully damp.
A fixed rule such as “every seven days” is unreliable. A small terracotta pot in strong summer light may dry quickly, while a glazed pot in a cool winter room can stay damp far longer. The plant and the mix should decide the timing.
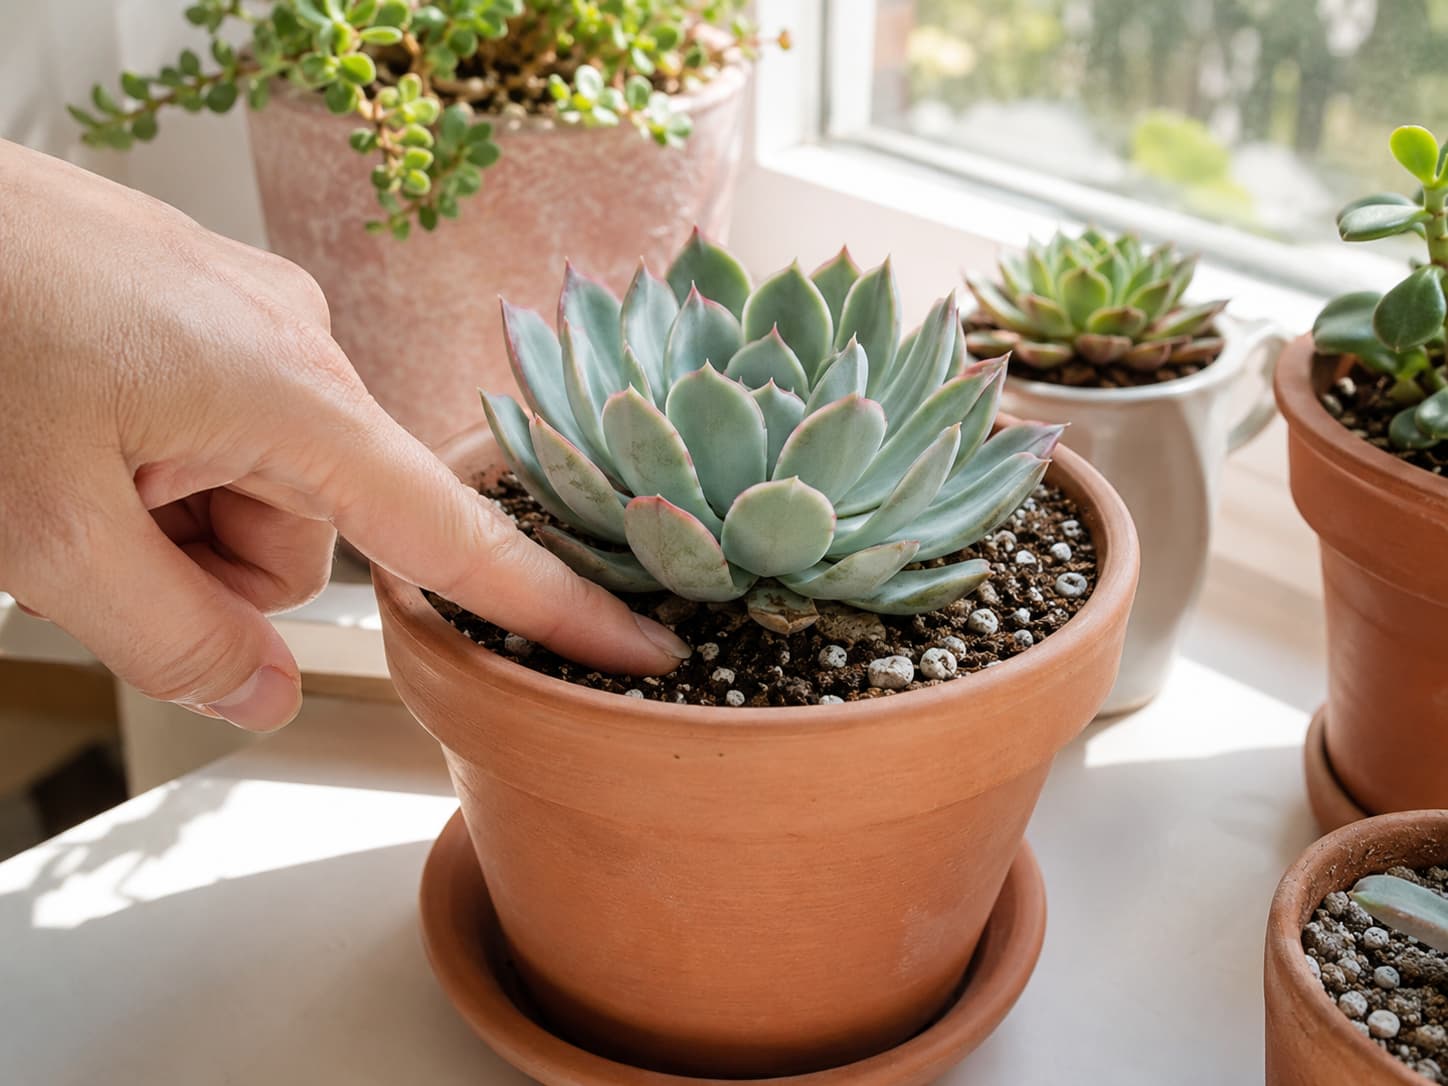
Do not diagnose underwatering from one symptom alone. Wrinkled leaves can occur when the plant is genuinely dry, but damaged or rotting roots can also prevent water uptake. Check the potting mix and root condition before automatically adding water.
3. Use Fast-Draining Soil, Not One “Perfect” Recipe
“Well-draining soil” matters because Echeveria roots should not remain in dense, saturated mix for long periods. A commercial cactus or succulent mix is a practical starting point, but some products are much more moisture-retentive than others. In practical Echeveria care, the goal is a root zone that drains freely and regains air space as it dries.
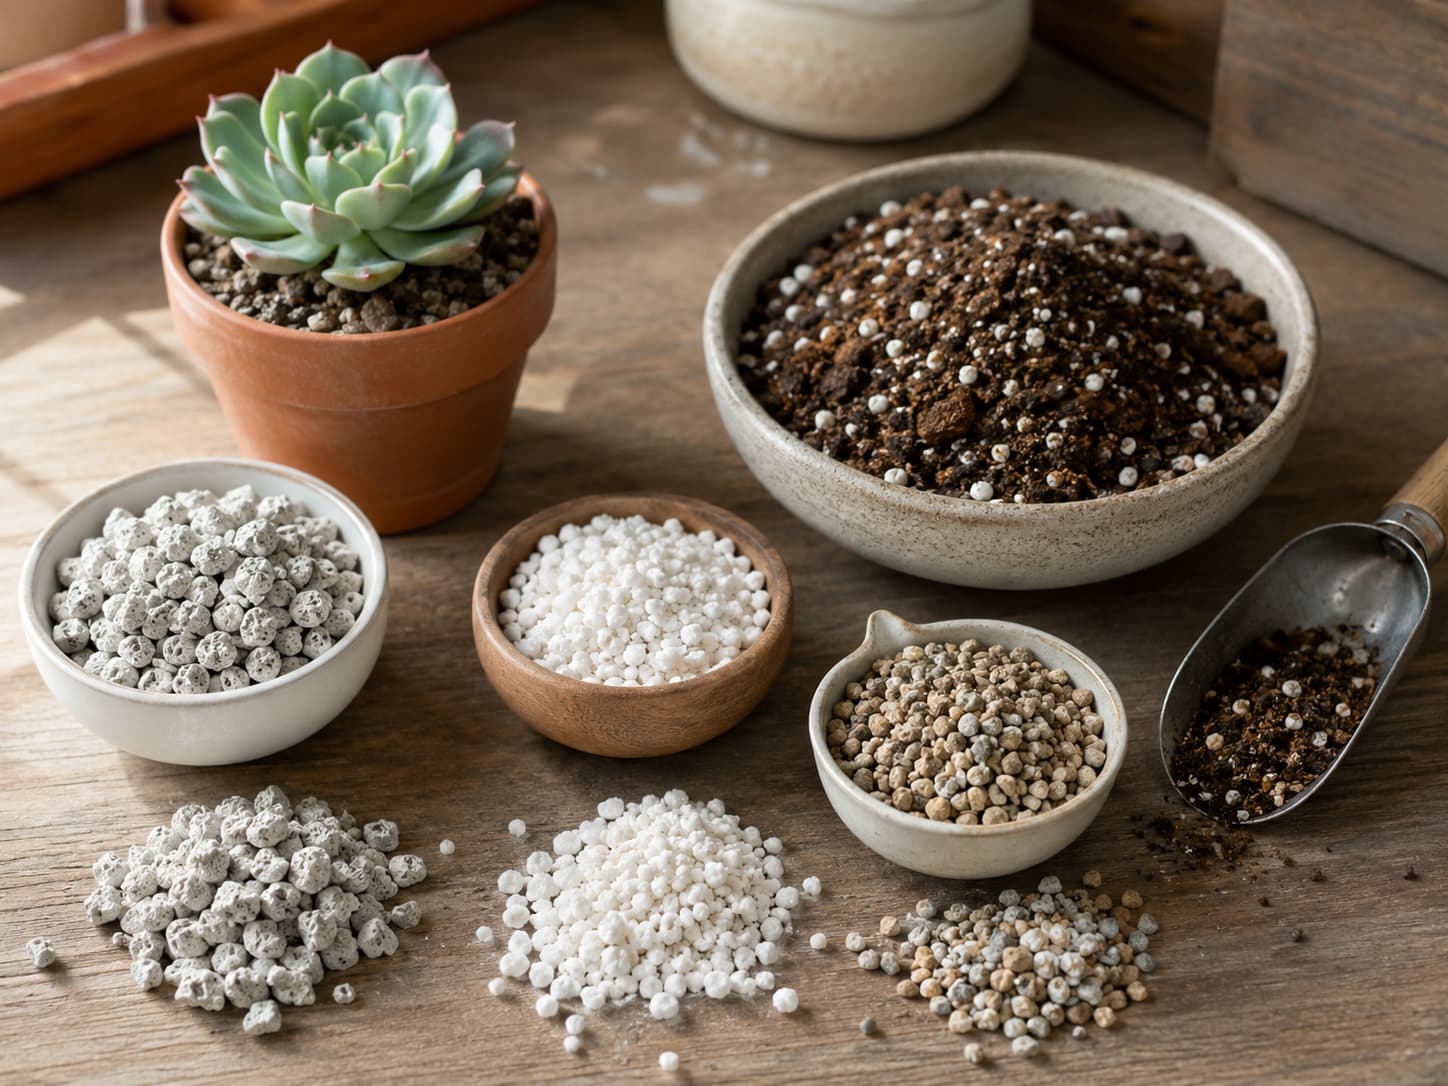
If your base mix stays wet for too long, amend it with a coarse mineral material such as pumice, perlite, or horticultural grit. The amount you need depends on your climate, container, light, and the base mix itself. A useful mix should wet evenly, drain freely, and regain air space as it dries.
If a bagged cactus mix behaves more like ordinary potting soil, start by blending in a generous amount of coarse mineral amendment and test how the pot drains. Adjust the mix rather than forcing every Echeveria into the same fixed percentage recipe.
What to Avoid
- Dense garden soil in a houseplant pot — it can compact and drain unpredictably.
- Very fine sand as the main drainage fix — fine particles can reduce pore space when mixed with some potting soils.
- A decorative container with no drainage route — water can accumulate out of sight.
- A gravel layer as a substitute for drainage holes — the pot still needs a reliable way for excess water to leave.
4. Choose a Pot That Helps the Roots Dry Normally
Drainage holes matter more than decorative style. A pot without an exit for excess water makes it much harder to know what is happening around the roots, especially when the container sits inside a decorative cachepot.
Terracotta is useful because it loses moisture through its porous walls, but it is not mandatory. Glazed ceramic and plastic can also work when the mix is airy and watering is adjusted. For everyday Echeveria care, the container only needs to support normal drying and provide a reliable drainage route. The main mistake to avoid is moving a small root system into a dramatically oversized container filled with a large volume of wet mix.
When to Repot
Repot when drainage has slowed because the mix has broken down, roots are severely congested, the plant is unstable in its pot, or you need to inspect unhealthy roots. Choose the next container based on the root system, not the width of the rosette alone.
5. Indoor Temperature, Airflow & Seasonal Placement
Echeverias are commonly grown as tender houseplants in cool-winter climates. RHS guidance for the genus emphasizes keeping plants frost-free and reducing water in winter. Good indoor Echeveria care means adjusting watering as light and drying speed change through the year. Ordinary household temperatures can work, but low winter light combined with warm rooms and frequent watering can encourage weak growth.
You do not need to mist an Echeveria to increase humidity. Instead, prioritize light, drainage, and ordinary air movement around the plant. If you water from above, avoid leaving water trapped in the center of a tight rosette for long periods, especially in cool, low-light conditions.
Moving Echeveria Outdoors for Summer
If you move a house-grown plant outdoors, start in a protected bright position and increase sun exposure gradually. Indoor leaves can scorch when they are suddenly exposed to much stronger outdoor sunlight. Bring tender plants back to a protected location before frost.
6. Feed Lightly During Active Growth
Echeveria does not need heavy feeding. If the plant is growing in a low-nutrient mineral-rich mix, a light application of an appropriate houseplant or succulent fertilizer during active growth can be useful. Follow the product label and avoid treating fertilizer as a fix for weak light or chronically wet roots.
If new growth is pale, small, or stretched, check light and root health first. A plant cannot be fertilized out of insufficient light, and feeding damaged roots does not correct poor drainage.
7. Common Echeveria Care Problems
Succulent symptoms overlap. Rather than matching one leaf to one diagnosis, use the symptom as a reason to inspect light, moisture, roots, stem texture, and pests.
| What you see | What it can suggest | What to inspect first |
|---|---|---|
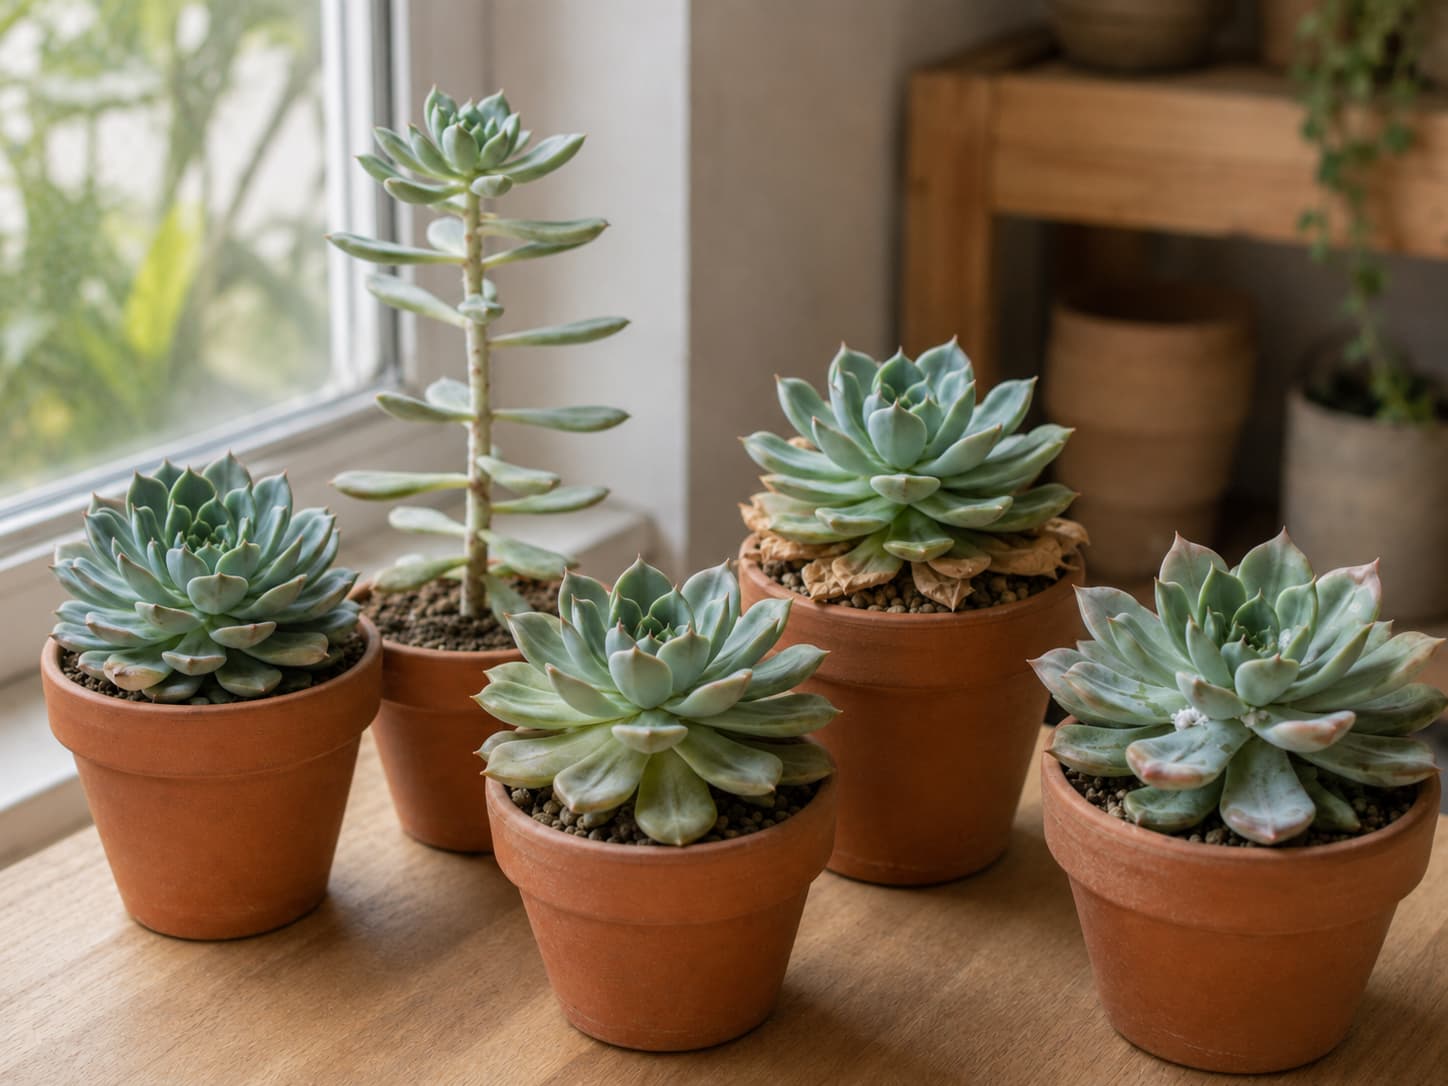
| Long stem and wide spaces between new leaves | Insufficient light / etiolation | Window intensity, distance from light, seasonal change |
| Soft or translucent lower leaves | Excess moisture, damaged tissue, or root/stem decline | How long the mix stays wet; roots and lower stem |
| Wrinkled or deflated leaves | Water deficit or roots unable to supply water | Soil moisture plus root condition |
| Dry, papery lowest leaves | Normal aging if the center remains firm and healthy | Whether new growth looks normal |
| Pale tan or bleached patches after a move | Possible sun scorch | Recent change from indoor shade to intense direct sun |
| White cottony clusters in leaf joints | Possible mealybugs | Leaf bases, lower leaves, stem, nearby plants |
What to Do if You Suspect Rot
Stop watering and inspect the root system and lower stem. Healthy roots and stems should be firm. Remove clearly dead or rotten material with a clean tool. If the lower stem is collapsing but the upper rosette is still firm, a healthy top section may sometimes be saved as a stem cutting.
What to Do About Mealybugs
Isolate the affected plant and inspect the tight spaces between leaves. For a small infestation, physically removing visible pests can help. If you use a horticultural treatment, follow the product label carefully and test on a small area first because the waxy leaf coating on some Echeverias can be easily marked.
8. Can a Stretched Echeveria Become Compact Again?
Existing stretched stem sections do not shrink back into a tight rosette. The useful goal is to improve the environment so new growth becomes more compact.
For a mildly stretched plant, improve light gradually and leave the plant intact. For a very long bare stem, experienced growers often restart the upper rosette as a stem cutting. Allow a fresh succulent cutting to dry and form callus before placing it into an appropriate rooting medium.
First correct the light. Cutting and re-rooting a stretched rosette without improving the growing conditions simply produces another plant that stretches again.
9. How to Propagate Echeveria
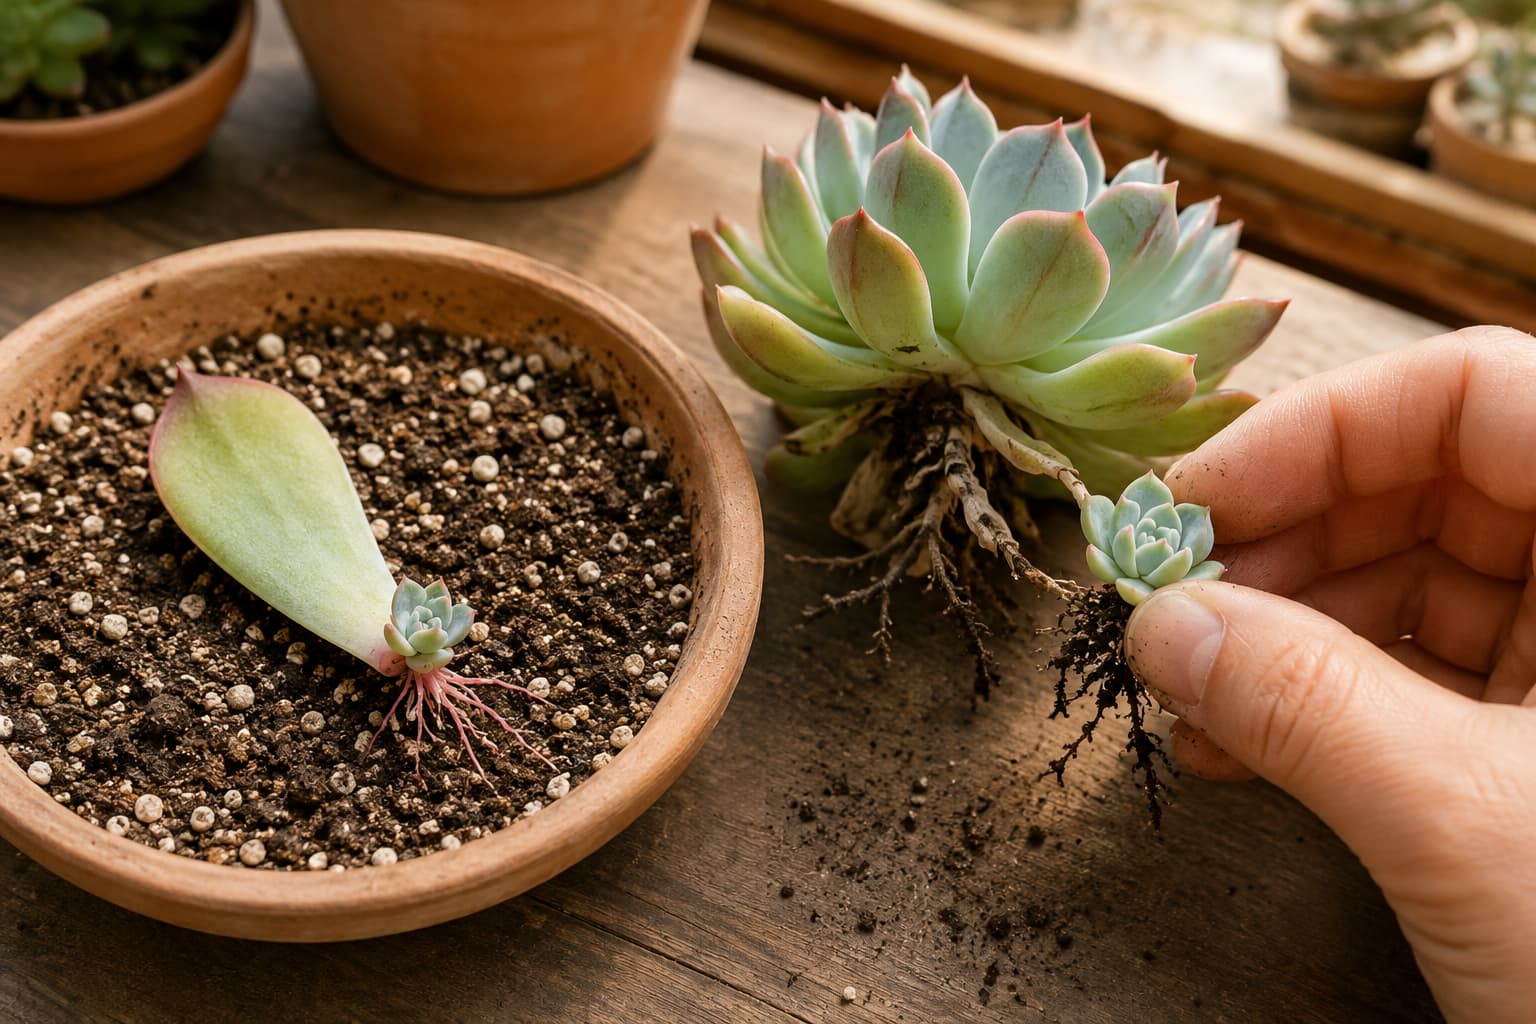
Echeverias can be propagated by several methods, including offsets, leaf cuttings, and stem cuttings. The easiest method depends on the plant in front of you: a clumping plant may give you offsets, while a stretched plant may be a better candidate for a stem cutting.
Leaf Propagation
- Select a healthy, undamaged mature leaf.
- Remove it cleanly so the base of the leaf remains intact.
- Let the wound dry and callus rather than placing a fresh wound into wet medium.
- Set the leaf on or against a free-draining propagation medium in bright, non-scorching light.
- Be patient. Rooting and new rosette formation vary with species, temperature, and conditions.
- Once a new plant has established its own roots and leaves, move it into a small draining container.
Offsets
Mature Echeverias often form small plantlets around the base. When an offset has enough size and root of its own to handle safely, it can be separated and potted individually.
Stem Cuttings
Stem cuttings are especially useful for rejuvenating a stretched plant. Use clean tools, let the cut surface callus, then root the firm healthy section in a suitable free-draining medium.
10. Adjust Echeveria Care With the Season
The main seasonal change is not a date on the calendar—it is the change in light, temperature, and drying speed. A pot that dries quickly in a bright summer location may stay damp much longer during a cool, dim winter.
| Season | Adjustment | Watch for |
|---|---|---|
| Spring | Increase checking as light and active growth increase; repot if genuinely needed | Pests hiding in tight leaf joints |
| Summer | Check more often in heat; acclimate gradually before stronger outdoor sun | Sun scorch after a sudden move outdoors |
| Fall | Expect drying to slow as daylight falls; reduce feeding as growth slows | Continuing a summer watering rhythm into cooler weather |
| Winter | Keep the plant bright and water less often when the mix takes longer to dry | Stretching from low light and root problems from cold, wet mix |
Popular Echeveria Types
Care is broadly similar across many commonly sold Echeverias, but species and cultivars differ in leaf coating, growth habit, color, and tolerance of particular conditions. If you know the exact name of your plant, check species- or cultivar-specific guidance rather than assuming every rosette behaves identically.
| Type | Typical look | Useful note |
|---|---|---|
| Echeveria elegans | Pale blue-green, clumping rosettes | RHS lists it as suitable for patio and container growing in sharply draining compost |
| 'Perle von Nürnberg' | Lavender-gray rosette with pink tones in good light | Color and compactness depend strongly on light and growing conditions |
| 'Lola' | Pale rosette with soft lilac or pink tones | Protect the leaf surface from unnecessary rubbing or splashing |
The Greenmuse 3-Step Echeveria Routine
Step 1: Read the New Growth
If the newest leaves are staying close together and the rosette remains compact, your light is probably working. If the stem is lengthening and new leaves are spreading farther apart, improve light gradually.
Step 2: Check Before You Water
Use soil moisture, pot weight, season, and recent conditions—not a weekly reminder—to decide whether the root zone is ready for water.
Step 3: Fix the Environment Before the Symptom
A yellow, wrinkled, or soft leaf is a clue, not a diagnosis. Check light, roots, drainage, stem firmness, and pests before adding fertilizer, water, or another treatment.
Echeveria care becomes calmer when you stop trying to make the plant follow a schedule. Watch what the newest growth and the root zone are telling you, make one useful adjustment at a time, and give the plant time to respond.
Frequently Asked Questions
How much light does Echeveria need indoors?
Give it the brightest suitable indoor position you can provide. Some direct sun can be useful, but acclimate a plant gradually when moving it into much stronger light. If new growth begins stretching, supplemental lighting may be needed.
How often should I water Echeveria?
There is no reliable fixed interval. Water thoroughly, let excess water drain, then wait until the potting mix has dried substantially before watering again. Drying time changes with season, light, temperature, pot material, and root size.
Can Echeveria take direct sun?
Many Echeverias can handle substantial direct sun once acclimated, while others are commonly grown in bright or filtered light. A house-grown plant can scorch if it is moved suddenly from weak indoor light into intense outdoor sun, so increase exposure gradually.
Why are my Echeveria leaves falling off?
Dry, papery lower leaves can be normal aging. Soft, translucent, or easily detached leaves deserve a closer look at soil moisture, roots, and the lower stem. Recent heat or physical damage can also cause leaf loss, so use texture and context rather than color alone.
Why is my Echeveria growing tall?
A lengthening stem with wider gaps between new leaves usually points to insufficient light. Existing stretched stem will not become compact again, but stronger appropriate light can make future growth tighter.
What soil is best for Echeveria?
Use a sharply free-draining cactus or succulent mix. If the base product stays wet too long, add coarse mineral material such as pumice, perlite, or horticultural grit until drainage and drying improve.
Does an Echeveria pot need drainage holes?
Yes, drainage holes make excess water much easier to manage. A decorative cachepot can still be used around a draining nursery or terracotta pot, but empty any water that collects inside it.
Can Echeveria live indoors year-round?
Yes, provided you can give it enough light and avoid keeping the root zone wet for too long. Winter is often the hardest period because indoor light falls while drying slows.
What is the difference between Echeveria and Sempervivum?
Both form succulent rosettes, but many commonly grown Echeverias are tender and protected from frost, while many Sempervivums are much more cold-hardy outdoors. Identification to genus matters before applying winter-care advice.
Final Thoughts
Healthy Echeveria care is less about memorizing exact hours, percentages, or watering intervals and more about creating the right system: strong appropriate light, a breathable root zone, a draining pot, and enough time between waterings for the mix to dry.
If your plant is stretching, dropping leaves, or turning soft, start with the basics before making several changes at once. Where is the plant sitting, how long does the pot stay damp, and what does the newest growth look like? Those three answers usually point toward the most useful next step.