Daylily Care Through the Seasons: When and How to Cut Back for Healthier Blooms
Learn when to deadhead, divide, and cut back daylilies through spring, summer, fall, and winter for healthier plants and more reliable blooms.
Quick Summary
Daylilies (Hemerocallis) are among the most forgiving perennials you can grow — but "low maintenance" doesn't mean "no maintenance." The single most impactful thing you can do for healthier blooms is knowing when and how to cut them back at the right time of year. This guide walks you through daylily care season by season: what to do in spring, summer, fall, and winter — plus how to troubleshoot the most common problems gardeners face, from plants that won't bloom to yellowing foliage and overgrown clumps that need dividing.
In This Guide
- Why Cutting Back Daylilies Matters More Than You Think
- Daylily Care Calendar: A Season-by-Season Guide
- Spring: Cleanup and First Feeding
- Summer: Deadheading, Watering, and Mid-Season Grooming
- Fall: The Big Cutback — When and How
- Winter: Dormancy and Protection
- Why Aren't My Daylilies Blooming? (The #1 Reddit Question)
- How and When to Divide Overgrown Daylilies
- 5 Common Daylily Care Mistakes
- Frequently Asked Questions
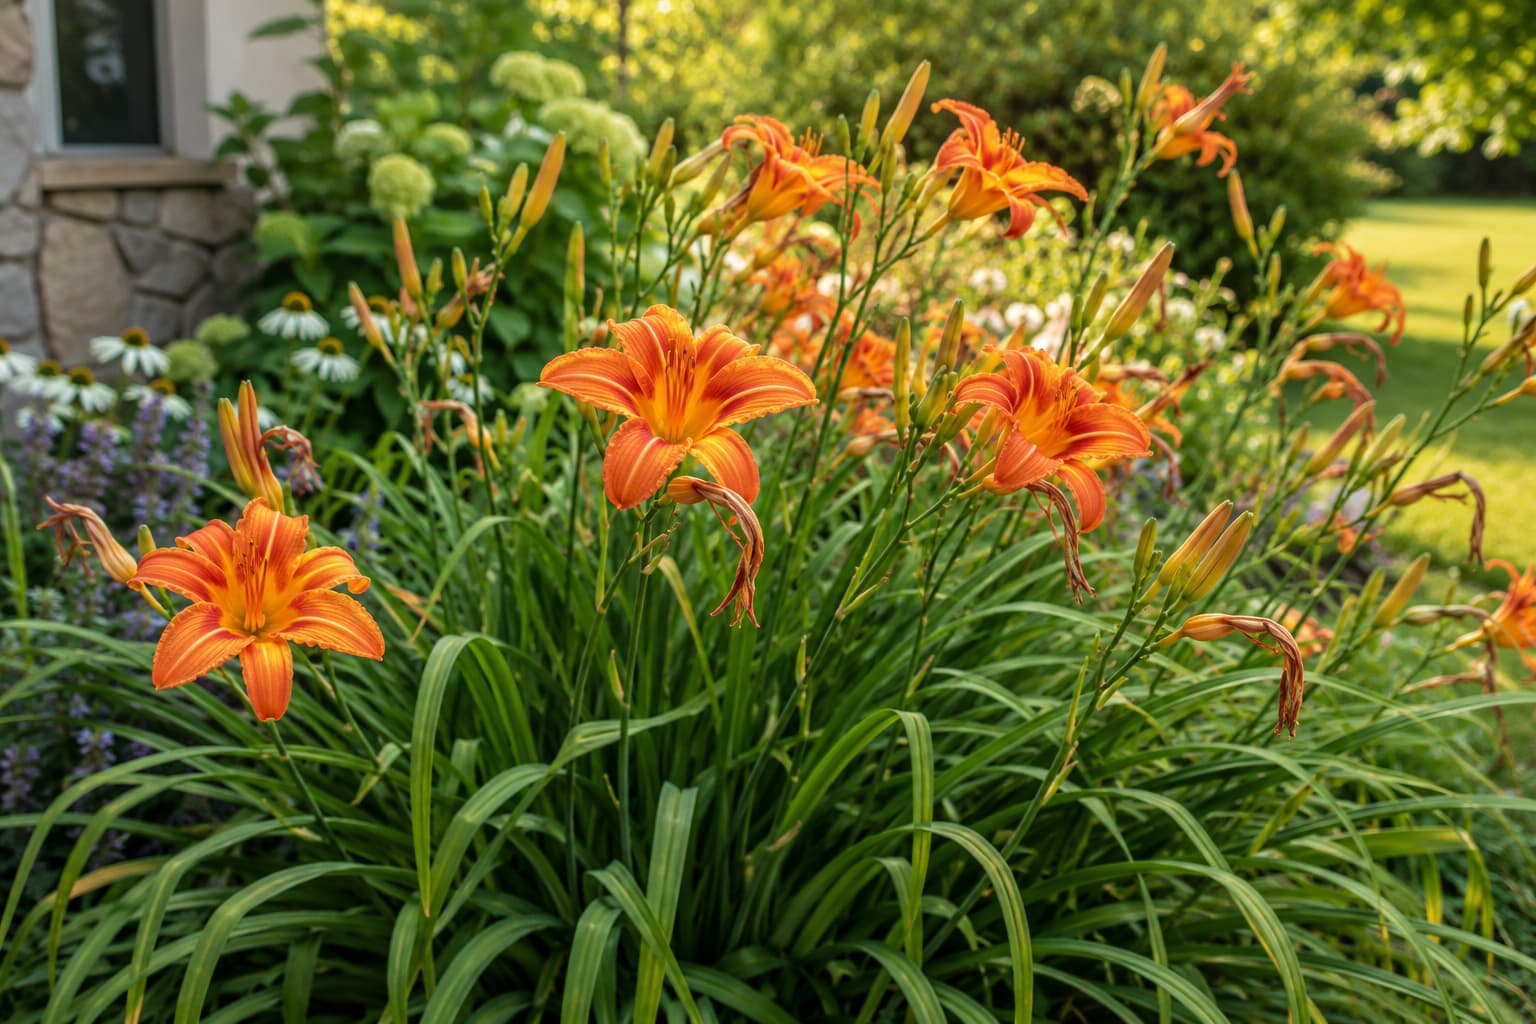
Why Cutting Back Daylilies Matters More Than You Think
Daylilies have a reputation for being nearly indestructible — and to be fair, they are tough plants. You can neglect them for years and they'll probably survive. But if you want more blooms, healthier foliage, and plants that don't look ragged by August, cutting back at the right time makes a dramatic difference.
Here's what well-timed cutting back actually does:
- Prevents unnecessary seedpod development and keeps the planting tidy; repeat flowering still depends on the cultivar and growing conditions
- Removes diseased or pest-damaged foliage before problems spread to healthy tissue
- Improves air circulation through the clump, reducing fungal issues like daylily leaf streak
- Keeps the garden looking tidy through every season, not just the two weeks they're in bloom
But here's where most advice falls short: it doesn't distinguish between the three different types of cutting back that daylilies need — and they happen at different times for different reasons.
Three Types of Daylily Cutback
Deadheading = removing individual spent flowers (daily in summer). Grooming = trimming yellow or ragged leaves during the growing season (as needed). Cutting back = shearing the entire plant to the ground (once a year, in fall or early spring). Each one serves a different purpose — don't confuse them.
Daylily Care Calendar: A Season-by-Season Guide
Daylily care isn't complicated, but timing is everything. Here's exactly what to do — and when — organized by season so you never miss a critical window.
| Season | Key Tasks | Timing |
|---|---|---|
| Spring | Clean up old debris, remove winter mulch, first feeding, divide if needed | As soon as new growth appears (March–April) |
| Summer | Deadhead daily, water during dry spells, groom yellow leaves, light mid-season feed | Bloom period through late summer (June–August) |
| Fall | Full cutback of foliage, final weeding, mulch for winter protection | After first killing frost (October–November) |
| Winter | Leave plants alone under mulch, check for frost heave after hard freezes | Dormant months (December–February) |
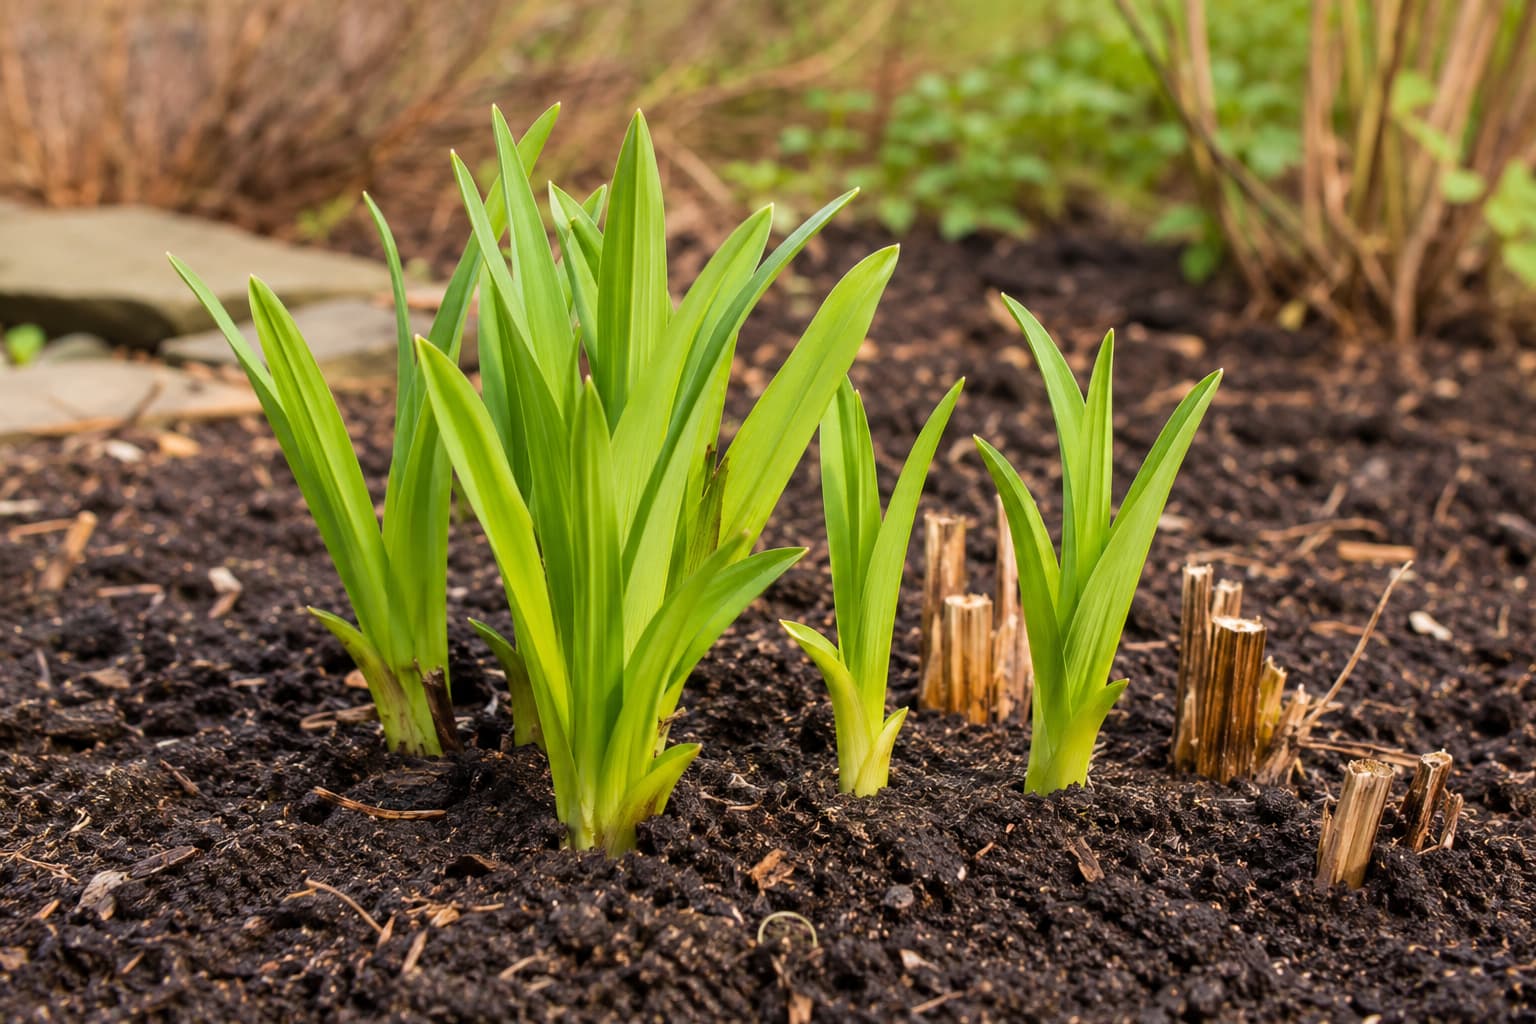
Spring: Cleanup and First Feeding
Spring is when daylilies wake up — and it's your first big opportunity to set them up for a strong blooming season.
Clean Up Old Growth First
If you didn't cut back in fall, early spring is your second chance. Remove all dead, brown foliage from last year before new green shoots get tangled up in it. Pull the old leaves gently — they often detach easily from the crown. If they resist, use clean shears and cut them about an inch above the soil line.
Avoid Pulling Resistant Foliage
If old leaves don't come away easily, cut them — don't yank. Pulling can damage the crown and create entry points for rot.
First Feeding of the Year
When you see 3–4 inches of new growth, apply a balanced slow-release fertilizer (something like 10-10-10 or 5-10-5). Daylilies aren't heavy feeders, but a spring meal makes a noticeable difference in bloom count. One light application is usually enough — more isn't better.
If you prefer organic options, a 1-inch layer of well-rotted compost around each clump (not piled against the crown) works beautifully.
Spring Dividing (Optional)
If your daylilies were overcrowded last year — fewer blooms than usual, smaller flowers, a dead center in the clump — early spring is the ideal time to divide them. More on this in the dividing section below.
Summer: Deadheading, Watering, and Mid-Season Grooming
Summer is showtime for daylilies — but it's also when they need the most consistent attention. The good news: it's mostly quick, daily tasks.
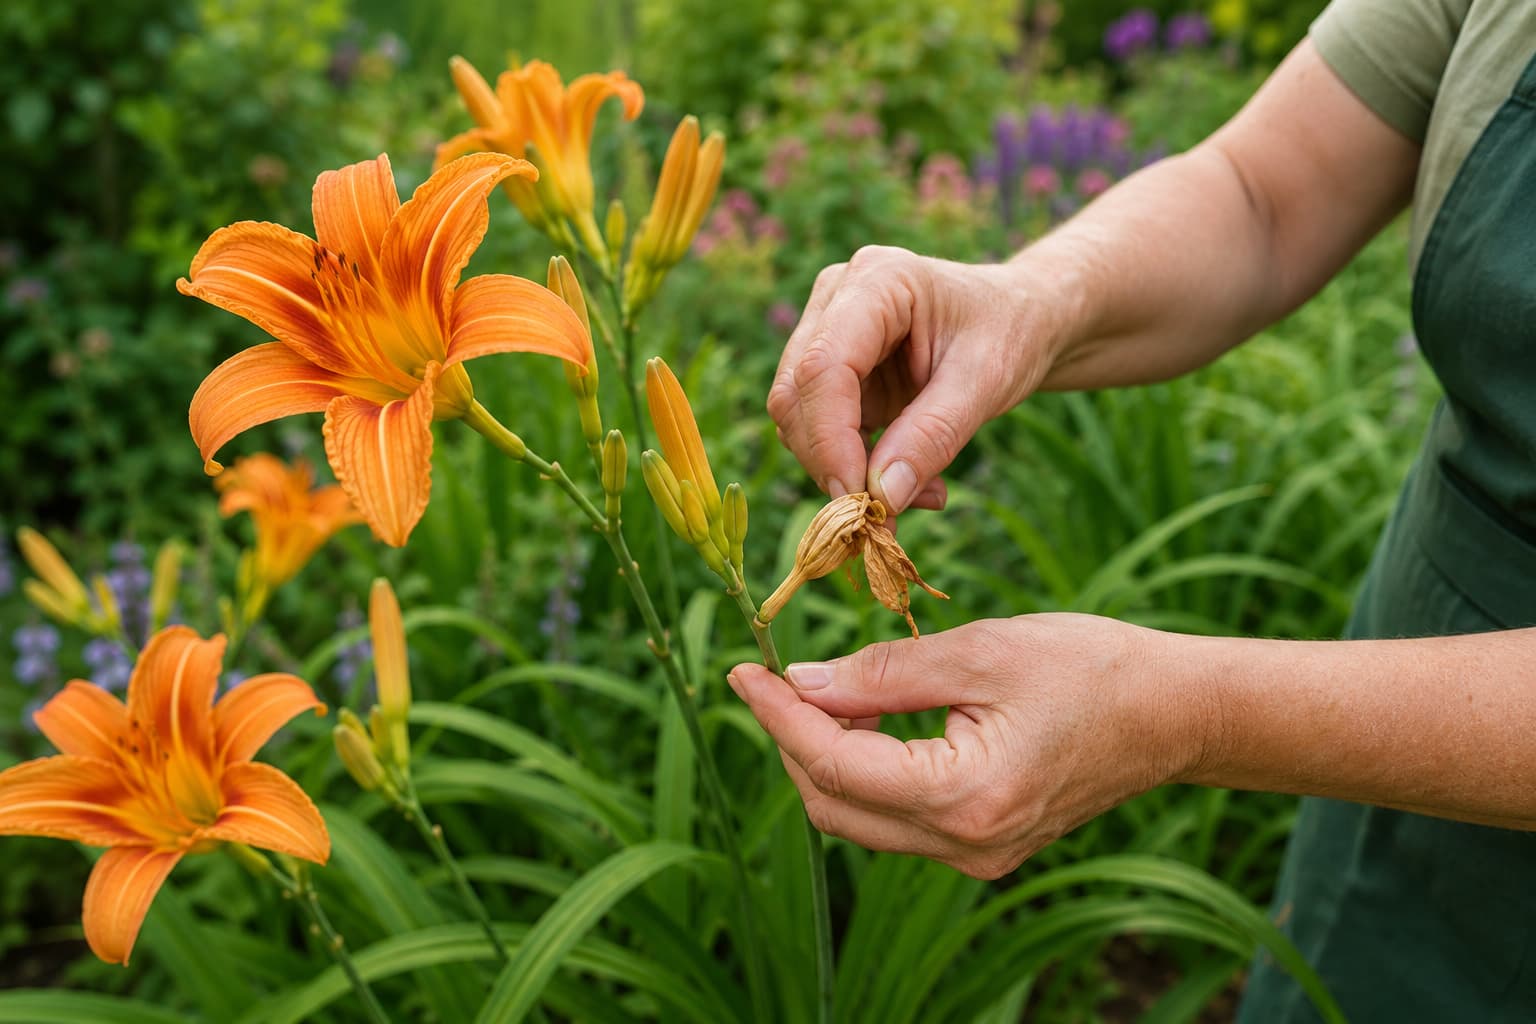
Deadheading: The 30-Second Daily Habit
Each daylily flower lasts exactly one day — that's where the name comes from. Once a flower fades, removing it keeps the clump tidy and prevents seedpods from forming. Deadheading may support continued flowering on reblooming cultivars, but it will not make every daylily produce a second flush.
Every day or two during bloom season, walk through your garden and snap or snip off each spent flower. Simply pinch the wilted bloom at its base and pull — it comes off cleanly. For the entire flower stalk (scape), wait until every bud on that stalk has bloomed, then cut the whole stalk down to the base.
Deadheading Tip
Don't overthink this. Spend 5 minutes each evening walking your daylily bed with a pair of snips. It's meditative, it keeps the plants blooming longer, and it prevents the garden from looking like a wilted mess. Many gardeners on Reddit say this is their favorite 5-minute garden ritual.
Watering During Bloom
Daylilies are drought-tolerant once established, but during their bloom period, consistent moisture = more and larger flowers. Aim for about 1 inch of water per week (from rain or irrigation). Water at the base, not overhead — wet foliage encourages leaf streak, a common fungal problem.
Mid-Season Grooming
By mid-to-late summer, you'll notice some leaves turning yellow or brown, especially the outer ones. This is normal — but leaving them on the plant makes the whole clump look tired and can harbor pests. Pull or trim individual yellow leaves as they appear. It takes two minutes and keeps the plant looking fresh through August and September.
Some gardeners on Reddit report their daylilies looking "completely fried" by late summer. This is often just heat stress combined with natural dieback — not a disease. Trim the worst leaves, keep watering, and the plant will push fresh growth when temperatures cool.
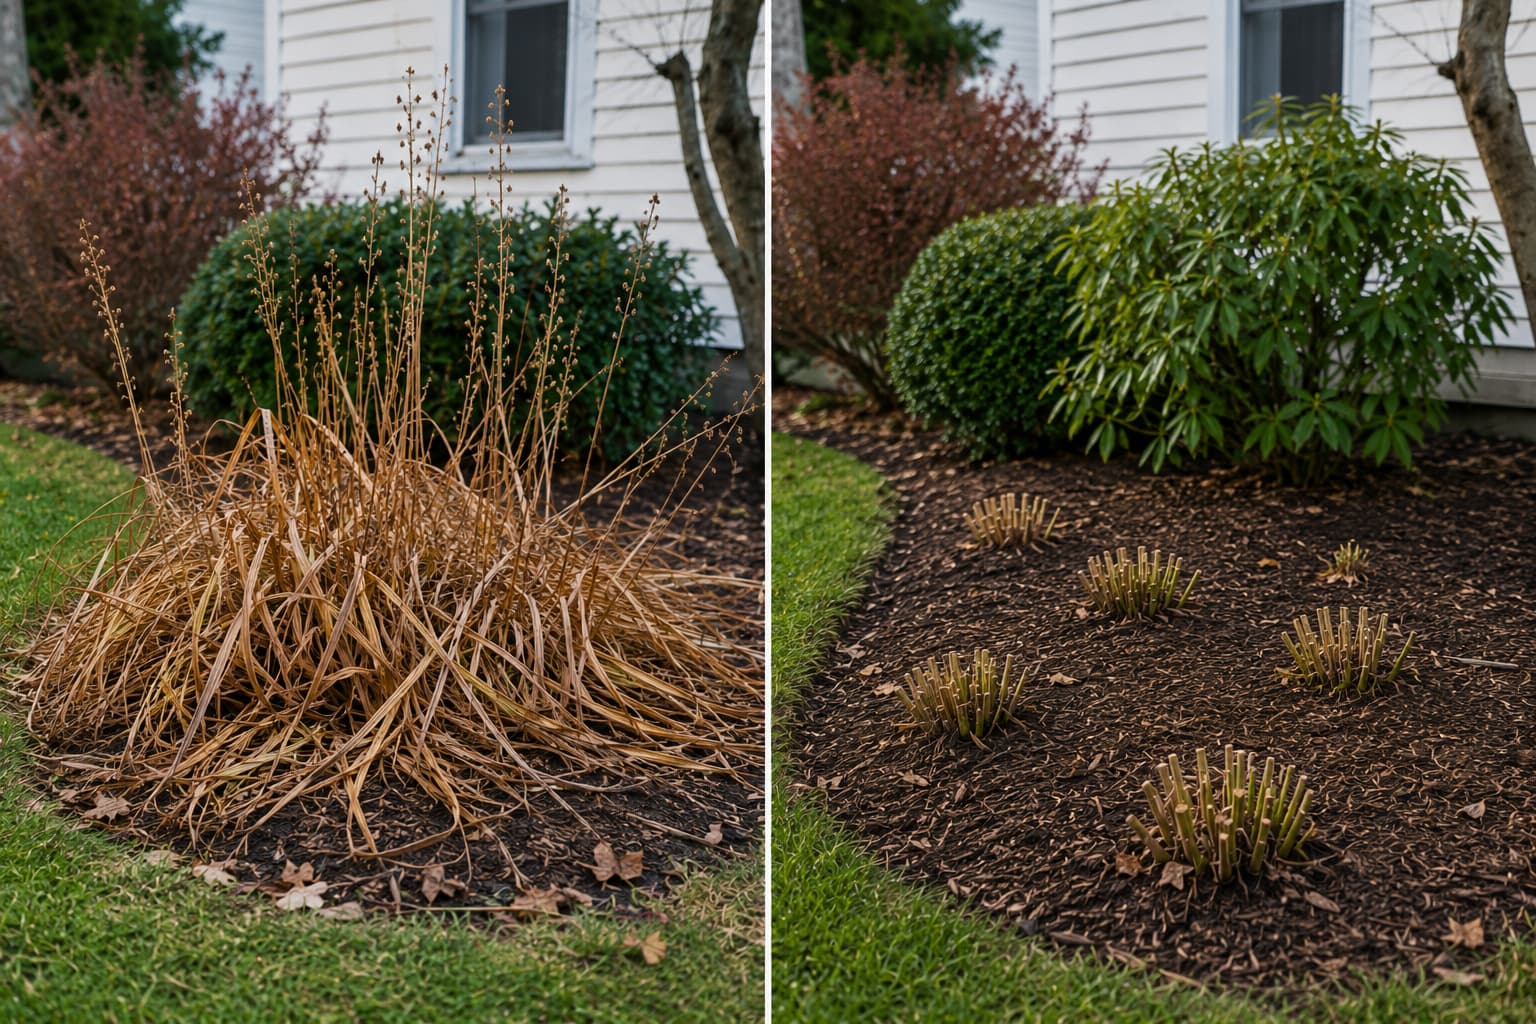
Fall: The Big Cutback — When and How
This is the section most gardeners search for — and the one with the most conflicting advice online. Let's clear it up.
When to Cut Back Daylilies in Fall
The short answer: after the first killing frost turns the foliage brown and limp. For most of the U.S., that's sometime between late October and mid-November. If you cut back too early — while leaves are still green — you're robbing the plant of the photosynthesis it needs to store energy in the roots for next year.
Here's how to tell it's time:
- Foliage has turned yellow-brown or completely brown
- Leaves are soft and collapse easily when touched
- Nighttime temperatures are consistently below freezing
How to Cut Back: Step by Step
- Use clean, sharp shears or hedge trimmers. Wipe blades with rubbing alcohol between plants if you suspect any disease.
- Cut all foliage down to 2–4 inches above the soil line. Don't cut flush with the ground — leaving a short stubble protects the crown.
- Remove all debris from the bed. Dead foliage left on the ground is a winter hotel for slugs, snails, and fungal spores.
- Apply a light layer of mulch (2–3 inches of shredded leaves, straw, or wood chips) around — not on top of — the crown.
Fall or Spring Cutback: Which Is Better?
This is one of the most debated topics among gardeners. The truth: both work, and the "right" answer depends on your situation. Fall cutback reduces pest and disease carryover and gives you a clean garden through winter. Spring cutback leaves the dead foliage as natural winter insulation (beneficial in very cold zones) and provides habitat for beneficial insects. If you garden in Zone 5 or colder, consider leaving the foliage until spring. In Zones 6+, fall cutback is generally preferred for disease management. Choose the timing that best fits your climate, disease pressure, and preferred winter-garden style.
Winter: Dormancy and Protection
Winter daylily care is mostly about doing very little — which is refreshing after a busy growing season.
What to Do (and Not Do)
- Do: Check after hard freezes for frost heave — when the freeze-thaw cycle pushes the crown up out of the soil. If you see exposed roots, gently press the crown back down and add more mulch.
- Do: Keep mulch in place until spring. It insulates the roots against temperature swings, which cause more winter damage than cold alone.
- Don't: Water during dormancy unless you're in a snowless, extremely dry winter. Dormant daylilies need very little moisture.
- Don't: Panic if you see a bit of green growth during a winter warm spell. Daylilies are tough — a brief January thaw won't kill them.
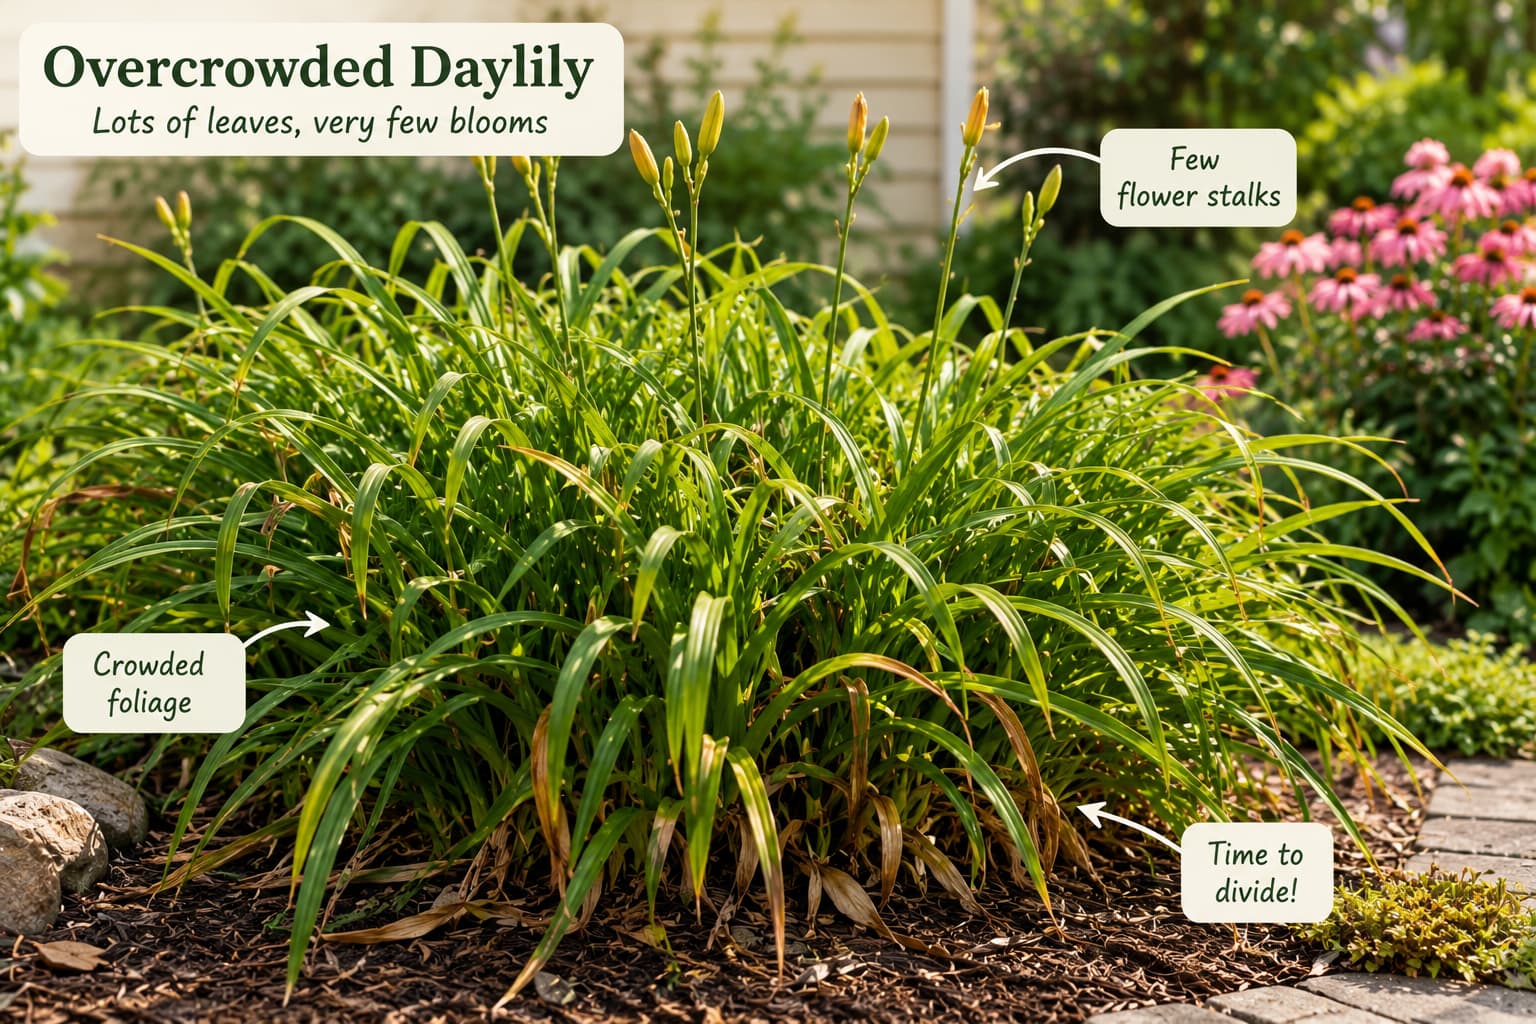
Why Aren't My Daylilies Blooming? (The #1 Question on Reddit)
Scroll through any gardening forum and you'll see this question repeated endlessly: "My daylilies are healthy and green, but I got almost no flowers this year. What's wrong?"
If your daylilies are producing lots of leaves but few or no flowers, here are the most common causes — ranked by how often they're the culprit:
1. Overcrowding (Most Common)
Daylilies multiply underground. After 3–5 years, a single fan becomes a dense clump, and the plants start competing with each other for nutrients and space. The result: great foliage, terrible blooming. The fix is dividing — see the next section.
2. Not Enough Sun
Daylilies need at least 6 hours of direct sun to bloom well. If a tree has grown larger and is now shading your daylily bed, or if you planted them on the north side of a structure, that's likely your problem. They'll survive in partial shade but bloom poorly or not at all.
3. Too Much Nitrogen
If you fertilize your lawn near your daylilies, they may be getting a nitrogen overdose from runoff. High nitrogen = lush green leaves at the expense of flowers. Avoid additional high-nitrogen feeding and keep lawn fertilizer from drifting or washing into the bed. Choose fertilizer according to a soil test rather than adding extra phosphorus automatically.
4. Planted Too Deep
Daylily crowns should sit no more than 1 inch below the soil surface. If you buried them deeper — which is easy to do accidentally when mulching heavily year after year — they'll struggle to push up flower scapes. Dig gently around one plant and check: if the crown is deeper than an inch, lift and replant it.
5. Wrong Variety for Your Zone
Some daylily varieties need a certain amount of winter chill to bloom well. If you're in Zone 9 or 10, look for low-chill or evergreen varieties specifically. Southern gardeners on Reddit frequently report blooming problems with northern-bred cultivars.
Quick Blooming Diagnostic
Lots of leaves, no flowers → overcrowding, too much shade, or excess nitrogen. Few leaves, few flowers → poor soil, underwatering, or disease. Flower stalks appear but buds drop → inconsistent watering or thrips. Match your symptom to the fix.
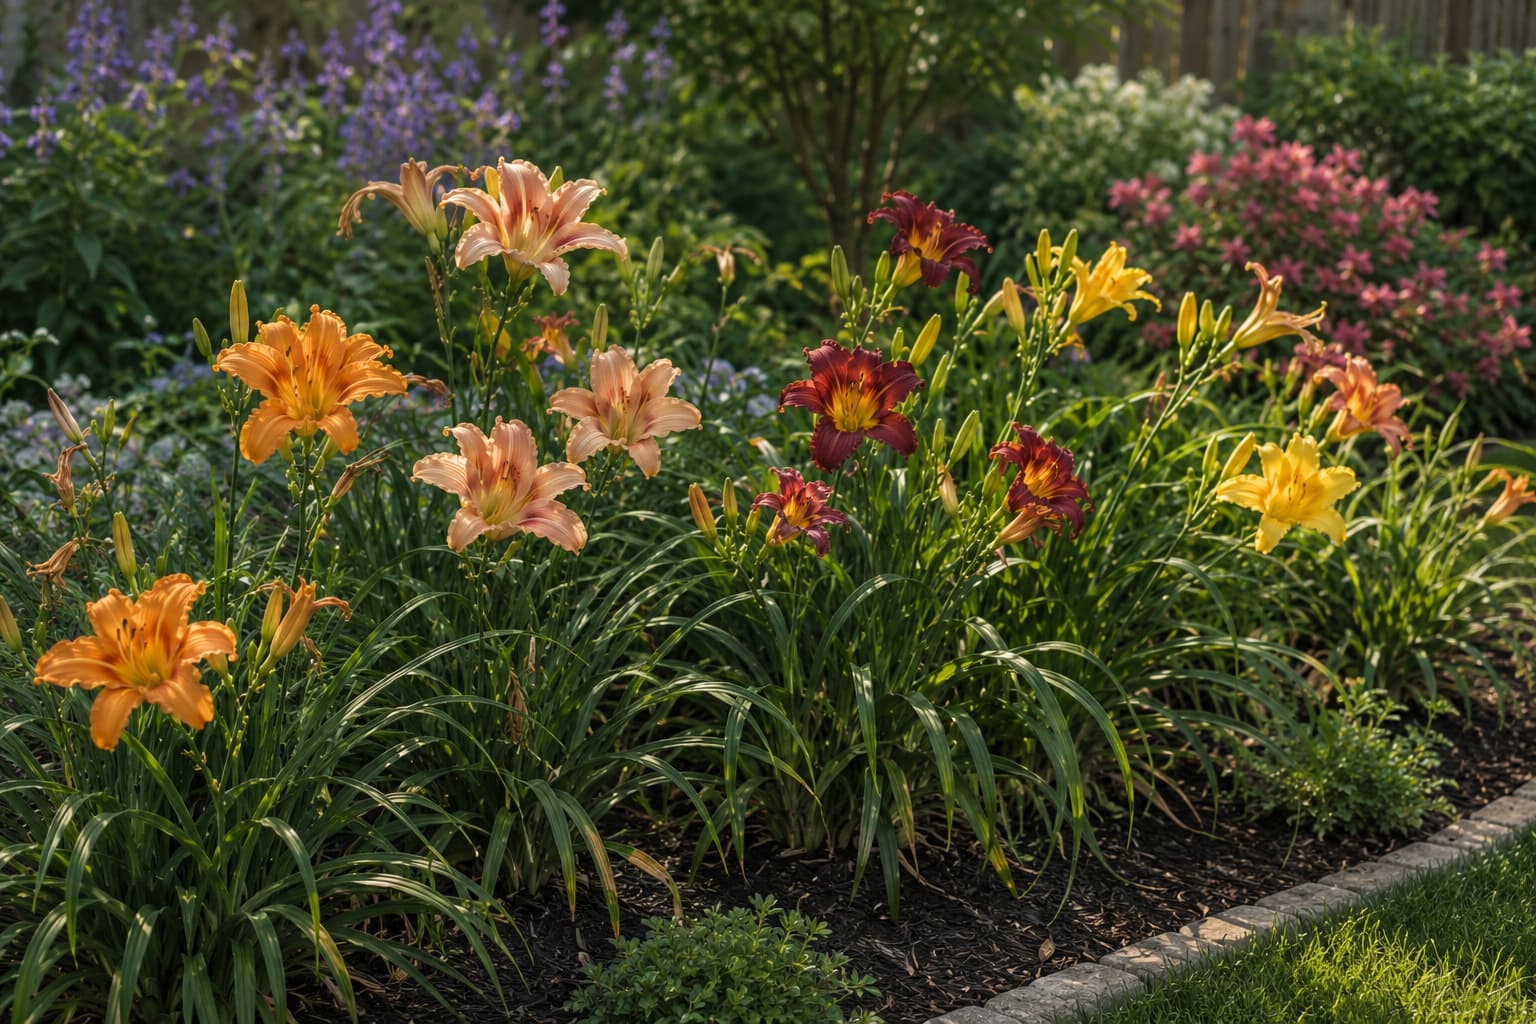
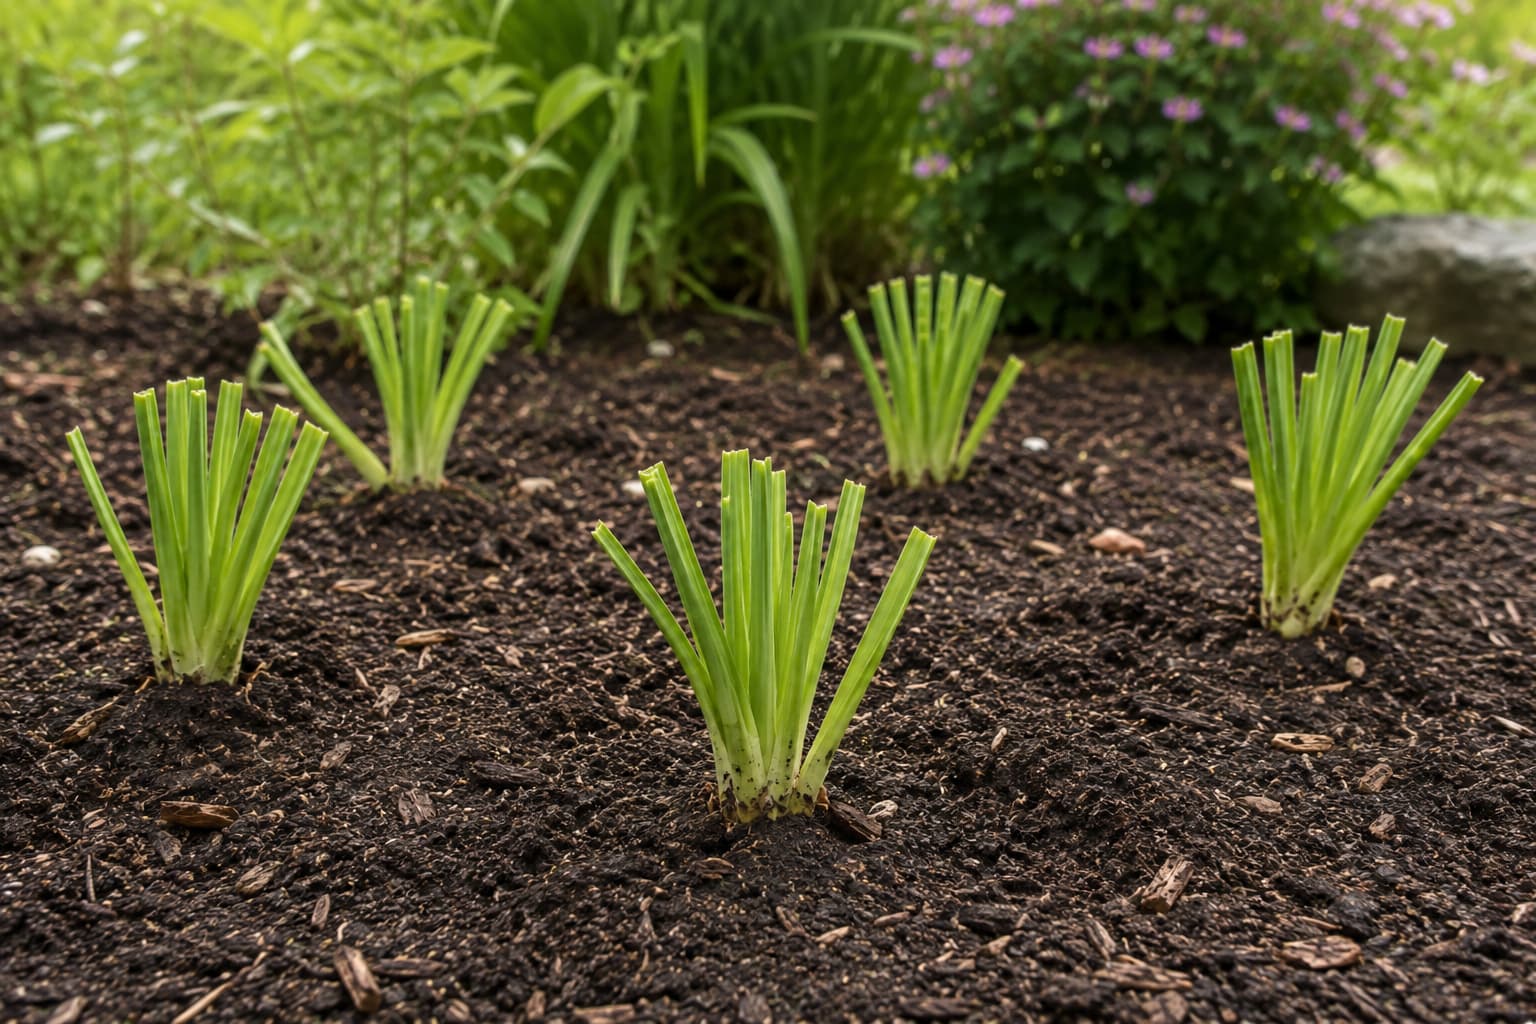
How and When to Divide Overgrown Daylilies
Dividing daylilies sounds intimidating if you've never done it, but it's actually one of the easiest perennial divisions you can do. Daylilies have tough, fleshy roots that handle being split much better than most plants.
When to Divide
Early spring (as new growth appears) or early fall (4–6 weeks before first frost) are both fine. Spring division gives the plants a full growing season to establish. Fall division works well in Zones 6 and warmer. Avoid dividing in the heat of summer — the stress is too much.
How often? Every 3–5 years, or when you notice blooming declining.
How to Divide: Step by Step
- Dig up the entire clump. Use a garden fork (not a shovel — you'll slice through roots). Start 6–8 inches from the center and work your way around, lifting gently.
- Shake or hose off excess soil so you can see the individual fans and where they connect.
- Separate the fans. Small clumps can be pulled apart by hand. Large, tangled clumps may need two garden forks inserted back-to-back in the center, then pried apart. As a last resort, use a sharp knife or spade to cut through the crown.
- Trim and inspect. Cut back foliage to about 6 inches. Remove any soft, rotting, or damaged roots. Each division should have at least 2–3 healthy fans with intact roots.
- Replant immediately. Don't let the roots dry out. Dig a wide, shallow hole, create a small mound in the center, spread the roots over the mound, and backfill so the crown is no more than 1 inch below the surface.
- Water deeply and keep the soil consistently moist for the first 2–3 weeks while new roots establish.
What to Do with Extra Divisions
You'll almost always end up with more divisions than you need. Give them to neighbors, trade them at a local plant swap, or start a new bed. Daylily divisions are one of the easiest "friendship plants" — and a great way to connect with other gardeners in your area.
5 Common Daylily Care Mistakes
Based on the questions that come up over and over on Reddit and gardening forums, here are the most frequent mistakes — and how to avoid them:
1. Cutting Back Green Foliage Too Early
Those green leaves are still feeding the roots. Wait until they've turned brown naturally — either from frost in fall or from natural senescence. Cutting green foliage is like turning off the factory while it's still producing.
2. Deadheading the Flower but Leaving the Stalk
Once every flower on a scape has bloomed, cut the entire stalk to the ground. Leaving bare stalks standing not only looks bad, it signals to the plant that it should put energy into that dead structure instead of new growth.
3. Planting Too Deep
This comes up constantly. The crown (where roots meet leaves) should be visible at or just below the soil surface. Bury it more than an inch deep and you'll get lots of leaves and almost no flowers. If in doubt, plant slightly shallower rather than deeper.
4. Ignoring the Dead Center
When a daylily clump has a bare, dead-looking center with all the growth around the edges, it's screaming to be divided. The original center fan has exhausted itself. Dig up and divide the healthy outer fans, discard the dead center, and replant.
5. Treating All Daylilies the Same
There are dormant, semi-evergreen, and evergreen daylily types, and they have slightly different needs. Dormant types (most common in cold climates) die back completely in winter and need that cold period. Evergreen types (common in the South) keep some foliage year-round and need less aggressive fall cutback. Know which type you have before deciding on your care routine.
Frequently Asked Questions
1. When is the best time to cut back daylilies?
After the first killing frost in fall, when foliage has turned completely brown. This is typically late October through November in most of the U.S. If you miss the fall window, early spring before new growth appears is your backup.
2. Should I cut back daylilies after they bloom?
Not the foliage — only the flower stalks. Once every bud on a stalk has bloomed, cut that stalk to the ground. Leave the green leaves alone; they're still feeding the roots for next year's flowers.
3. Why are my daylily leaves turning yellow in summer?
Some yellowing of outer leaves in late summer is normal — it's the plant retiring its oldest foliage. But if yellowing is widespread or happens early in the season, check for: overwatering (daylilies hate soggy soil), daylily leaf streak (a fungal disease that causes yellow streaks with brown centers), or nutrient deficiency. Trim affected leaves and improve drainage if needed.
4. Can I cut daylilies all the way to the ground?
Yes — but only when the foliage is already brown and dormant (after frost in fall). Leave about 2–4 inches of stubble to protect the crown. Never cut healthy green foliage to the ground during the growing season.
5. How do I get my daylilies to bloom more?
The top three levers: more sun (at least 6 hours direct), divide overcrowded clumps (every 3–5 years), and deadhead daily during bloom season. A light feeding with a balanced or low-nitrogen fertilizer in spring helps too. If you do all four and still have problems, check planting depth — crowns buried deeper than 1 inch will struggle to bloom.
6. What's the difference between daylilies and true lilies?
This confuses a lot of beginning gardeners. Daylilies (Hemerocallis) grow from fleshy, fibrous roots and each flower lasts one day. True lilies (Lilium) grow from bulbs, have a single central stalk with leaves arranged in whorls, and each flower lasts several days to weeks. The care is different — especially cutting back — so it's worth knowing which one you have.
7. Do deer eat daylilies?
Unfortunately, yes. Daylilies are not deer-resistant — deer will eat the flowers, buds, and even the foliage. If deer pressure is high in your area, you'll need physical barriers (fencing or netting) during bloom season, or try deer-repellent sprays reapplied after rain.
Sources & Further Reading:
Final Thoughts
Daylily care through the seasons isn't complicated — but timing matters. Here's what to remember:
- Spring: Clean up, feed lightly, divide if overcrowded
- Summer: Deadhead daily, water deeply once a week, groom yellow leaves as they appear
- Fall: Cut back after first killing frost, mulch for winter
- Winter: Leave them alone, check for frost heave after hard freezes
The single habit that makes the biggest difference: pay attention to your plants. If blooms are declining, something has changed — probably overcrowding, shade, or planting depth. The fix is almost always simple, and daylilies are forgiving enough to bounce back quickly once you address the problem.
If you found this guide helpful, you might also enjoy our guides on Echeveria Care and Growing Rosemary Indoors — two other plants that reward you for getting the timing right.
How do you handle daylily cleanup in your climate? Share your growing zone, cutback timing, and results with the Greenmuse community.
About the Author: Clara Moss is a gardener and former e-commerce professional who brings a practical, research-backed approach to plant care. Greenmuse combines practical growing experience with carefully checked horticultural guidance. Learn more about Clara.